How to do a Burpee!

BURPEES! You love them and you hate them.
Burpees are an amazing cardio workout and work many of your major muscle groups. Burpees are one of the best full body workouts you can do in your exercise routine, however it is also easy to do a burpee incorrectly, making the exercise not as effective.

To do a Basic Burpee:
1. Start in a standing position
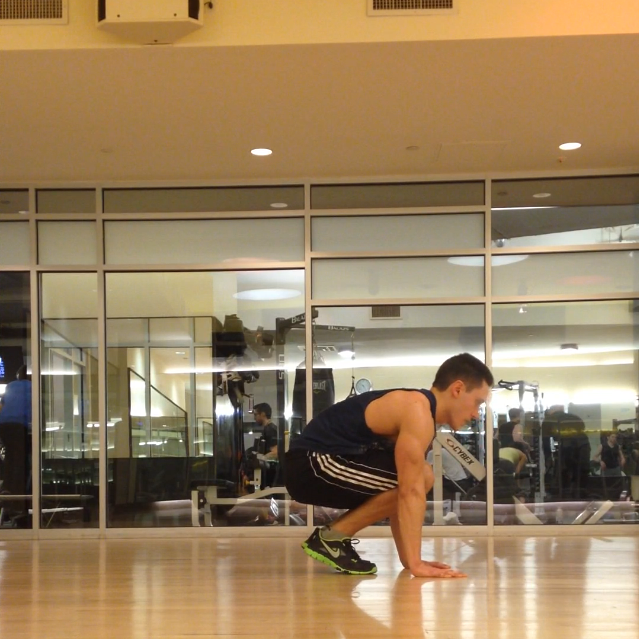
2. Squat down and place your hands on the ground.
3. Jump your feet back to put yourself in a plank position.
4. Jump your feet forward to return to the squat position.
5. Jump up straight off the floor from the squat position.
6. Repeat from Step #1

There are many variations of Burpees. The most common variation is the Burpee Pushup where one pushup is done while in the plank position. (Between steps #3 and #4 of the Basic Burpee instructions, do a pushup).

Tips:
1. When squatting down, try and get your glutes low to the floor. This will make the exercise seem harder, but that is because you are activating most of the muscles in your legs from your quads, to your glutes and hamstrings. This muscle activation will help tone your legs more effectively.
2. While in the plank position, make sure to keep your body completely flat and activate your core. It is very easy to raise you hips and glutes up toward the ceiling.
3. When jumping during this exercise, and in any other exercise, land with bent knees. If you jump and land with your legs completely straight, you will put too much pressure on your knees and lead to injuries in the future.
4. Burpees can be done as a FT workout (For Time) or AMRAP workout (As Many Reps As Possible). If you do a FT workout, give yourself a certain number of burpees to do and see how much time it takes you to complete the workout. If you choose to do an AMRAP workout, give yourself an amount of time, usually a minute or two, and see how many burpees you can do in the time allotted.

Burpee: Step 3

Burpee: Step 3

Burpee: Step 2

Burpee: Step 2

Burpee: Step 1

Burpee: Step 1

Burpee: Step 5

Burpee: Step 5

Burpee: Step 4

Burpee: Step 4

Burpee: Step 3a (optional pushup)

Burpee: Step 3a (optional pushup)

Burpee: Step 6

Burpee: Step 6

Do you include Burpees into your workout? Do you have any variations that you would like to share? Contact me at corestrengthalec@gmail.com for any questions, comments, or ideas for new topics.

How to get the most out of your Calf Raises!

Calves2
Calf Raises can be done many ways; however, there are a few tips to understand and follow in order to get the most out of the exercise.

  • First of all DO NOT BOUNCE! When you bounce or do quick calf raises, the work is being done by your Achilles tendon, not your calf muscles. You may feel a burn in your calf muscle, but it is not being targeted well enough to see results.
  • Doing a slow controlled movement from a rest (standing) position to the balls of your feet will activate all of the muscles in your calves.
  • If calf raises are done with straight legs, all of the parts of the calf will be working, but most of the work will be done by the very visible, large muscle on the outer part of the calf (Gastrocnemius). This will promote thickness and definition of your calf. If calf raises are done with bent knees, the smaller muscle behind the Gastrocnemius (Soleus) will be doing most of the work. Now although the Soleus muscle is not as visible as the Gastrocnemius, because it is behind the larger muscle, it will cause the Gastrocnemius to swell and visibly pop out more. Both are beneficial so I like to alternate between bent and straight legs between sets.
  • Calf raises can be very effective with no weight; however if you are doing weighted calf raises, the same principle applies. Use slow controlled motions rather than a bouncing movement.
  • Another possible way to change up the exercise is doing calf raises on a ledge where your heels hang over the edge. When lowering, go past parallel with the floor and stretch your calf muscles more. This will give you a wider range of motion for the muscle; therefore working the muscle in a different, harder way.

The gym I currently go to has a Power Plate. I like to start off my calf routine with 3 sets of slow calf raises on the Power Plate, and then I do 4 sets of weighted calf raises on one of the calf machines. Do what works best for you, but make sure to follow these tips.

I hope you found this article helpful. If you have any questions, concerns, or ideas for other articles, please email me at corestrengthalec@gmail.com

Good Carbs vs Bad Carbs

goodandbadcarbs
I think most of us have heard the terms ‘good carbs’ and ‘bad carbs’ before, but do we actually know what they mean. To make it as simple as possible, ‘Good Carbs’ come from foods that also have a good source of fiber. For example, fruit, vegetables, whole grains, beans, etc. ‘Bad Carbs’ come from foods with little to no fiber content, such as white bread, white rice, etc. Fiber allows the body to slowly digest the carbs that we consume which leads to more stable blood sugar. If we eat food high in carbs and low in fiber, we quickly digest the carbs which then causes spikes in our blood pressure.
One other major thing to understand about good carbs and bad carbs is the composition of the carbs themselves. When carbs are digested, they are broken down into glucose (sugar) which the body needs for energy. During digestion, the body will break down any carb it is given into glucose; however, because of the fiber and other nutritional value with good carbs, the body is taking in more than just glucose. With bad carbs, the body is only quickly converting the carbs to glucose with no other vitamins or minerals to digest; therefore the calories being consumed can be considered ’empty’ calories and not beneficial.

The moral of the story is:
1. Stay away from foods high in carbs, but low in fiber.
2. It is healthy to eat ‘good carbs’ (aka. foods with vitamins, minerals, and fiber)

I hope this article helped. If you have any comments, questions, concerns, or ideas for other blog post, email me at corestrengthalec@gmail.com .

Is Shoveling Snow a Good Exercise?

shoveling-snow2
Because Winter is now upon us, and we are definitely starting to see some heavy snowfall, I wanted to see if shoveling snow was a good way to get some exercise. I personally always dreaded going outside and clearing the driveway of snow, but after doing some research, I realized that it definitely has its benefits. According to an article done by Julie Garden-Robinson, Ph.D., L.R.D, at North Dakota State University, a person of 170lbs can shovel for 30 minutes and burn about 250 calories. (Click Here to See the Article) Because shoveling involves high repetitions of lifting a weighted object, it also can help tone your muscles in your arms, legs, and core if done correctly. Not too bad for a chore I hate doing.

shoveling-snow

It is important to also understand the dangers of shoveling before you go out and start throwing the snow around. A quote from masslive.com stated,

“According to a study published in the American Journal of Emergency Medicine, some 195,100 Americans were treated in emergency rooms for snow shoveling-related mishaps from 1990 to 2006. Among those cases, 7 percent were cardiac related, which made up all of the 1,647 deaths in the study.”

Click Here to see the Article on Masslive.com

Here are some tips to keep in mind:

  • Because shoveling can involve some heavy lifting at times, it also puts some people at risk of heart attacks. If you already have high blood pressure or are at risk of a heart attack, consult your doctor before you decide to go outside and shovel snow.
  • Make sure to always lift with your legs and tighten your core when lifting the snow.
  • Avoid twisting and lifting from your lower back to avoid lower back injuries which are common when shoveling.

So next time you go out to battle the cold and shovel, try to think of how it actually can help you reach our fitness goals. As long as you stay smart and safe by following the tips I shared, shoveling will can be more than just a chore, but a productive workout.

How did you like this post? Did you find it useful? Do you have any other ideas for future posts I should do? If you have any questions, comments, or concerns, feel free to contact me at corestrengthalec@gmail.com.

Do You Hate Running? Try Running In Reverse!

Ever since I was a kid, I never liked running. I didn’t mind playing a game of tag or running to a base during a kickball game, but when it came to long distance running, I never excelled… I flat out stunk at it. Friends of mine today keep telling me how they are preparing for different races, and all I can think about is how I can’t even stay on a treadmill for 10 minutes without wanting to pass out. I have tried entering races, running with friends, and even running with my dog, but I still can’t keep up. I have always wanted to reach that ‘runners high’ people talk about when they can just run for hours and just enjoy it, but no matter what I do, I have not been able to find a method that works for me… Until now!

Backward running
It may sound crazy, but one day at the gym, I decided to put the treadmill on a low speed and turn around. I started jogging backward, and eventually after a few mintues I was able to bump up the speed and pretty much run in reverse. I will admit it felt weird at first, but then I really started enjoying it. None of my joints were hurting, I wasnt running out of breath too quickly, and I was finally able to run for over 30 minutes without having any issues.

Now what are the benefits to running in reverse?
According to the New york Times Well blog and studies done by the University of Milan, running backwards can be easier on your joints, can help with muscle therapy, burn more calories, and increase balance. When running forward, a person puts a lot of tension and hard pounding on the knee joint. When running backward, however, there is much less hard pounding since our muscles and tendons act differently and instead of landing on our heels and taking off our toes like most people do when running forward, when running backward we land through our toes. Running backward also burns more calories because of the muscle and tendon activity. When running foward, we rely a lot of the motion and effort on the elastic energy in our muscles and tendons. When in reverse, this energy is not present, so we exert almost 30% more energy in order to run backward at the same speed. Our muscles are activated in order to stabalize our bodies in the backward motion which also helps improve our balance when moving both foward and backward and helps burns more calories.

When first implementing backward running, make sure to start off slow. It is a new motion for your body, and will take a little time to get used to. I currently only run backward at 4.5 mph on the treadmill to ensure safety, but also feel the benefits of the exercise. Trust me, after running backward for a few minutes, your calves and quads will be burning!

Try this exercise out and let me know what you think. Email me at corestrengthalec@gmail.com for any questions, comments, feedback, or ideas for future topics to discuss.

To view the New York Times Well blog article on reverse running, Click Here.

Bruschetta Spinach Omelette

Bruchetta Spinach Omelette

This omelette is not only a delicious breakfast, but it also is a great meal for any time of day. For anybody out there on a low carb diet, you need to try omelette recipes like this! The entire omelette has less than 5g of carbs, about 20g of protein, and a good amount of healthy fats (which you need on any diet!). Another reason I love this meal is because it takes only a few minutes to make. All you need to make this is 1 egg mixed with 2 egg whites, 1 cup of spinach, 2 tbsp of Parmesan Cheese, and a half cup of Bruschetta (plum tomatoes, garlic, basil, extra virgin olive oil, and other spices depending on what recipe you may try). Mix the egg and egg whites in a bowl and cook in a pan. Once most of the egg is cooked, flip the omelette over and add the spinach and cheese on top. Fold the omelette over and finish cooking until the omelette in golden. Place on a plate and add the bruschetta on top. Thats it! Try it out and let me know what you think!

Like this recipe? Have any you would like to share? Email me at corestrengthalec@gmail.com

Sauteed Burgers and Vegetables

Vege Burgers 2

I made this meal as my post-workout meal and I honestly can’t get enough of it. It’s packed with protein, good fats, and it’s filling… Just what I like for a good post workout meal!

All you need is:
2 Burger Patties (I did Vege Burgers)
2 cups of Raw Spinach
1 cup of Baby Portabella Mushrooms
1/2 cup of Chopped Onions
1 Egg
Extra Virgin Olive Oil or Coconut Oil

1. Lightly grease a pan with cooking spray or coconut oil.
2. Place the two burger patties in the pan and sautee until ready. (I used Vege burgers which take 6-8 minutes to cook in a pan. Other burger patties have different cooking times. Make sure to check the recommended cooking time for the patties you are using)
3. In a separate pan, heat 2 tbsp of extra virgin olive oil on medium heat
4. Add the 1 cup of baby portabella mushrooms and a 1/2 cup of chopped onions to the pan.
5. Sautee the vegetables until they start to get a golden brown color. (5-7 minutes)
6. Remove the sauteed vegetables onto a plate that is covered with a paper towel (This will help soak up extra unneccessary oil).
Vege Burgers 1
7. Gently wash and wet the 2 cups of raw spinach
8. Once the burger patties are done, remove the patties from the pan and put them on a plate. Put the damp spinach in this now empty pan that the burgers were once in.
9. Cook the spinach until its begins to turn dark green and shrink. (If the pan is hot, this should only take 30 seconds-1 minute)
10. Place the cooked spinach on top of the burgers, and add the sauteed vegetables on top of that.
11. In a pan, grease and fry 1 egg.
12. Add the egg on top of the vegetables and enjoy!

If you use vege burgers like I did, this meal comes to about 35g of protein and 22g of carbs. If you decide to use meat burger patties instead of vege burger patties, it will raise the protein by about 6g per patty, your carb intake will lower about 7g per patty, and your fat intake will rise depending on the cut and fat percentage of the meat! Meat patties are perfect for those who may be on a low carb diet because the entire meal will then contain less than 8g of net carbs.

Like this recipe? Have any recipe ideas of your own? Any questions or comments? Email me at corestrengthblog.wordpress.com!

Feature Friday: Eric Turner

Eric 1
First name: Eric
Last name: Turner
City: Houston
State: Texas (Originally from Herriman, UT)
Age: 32
Height: 6’1″
Weight: 208
Profession: Personal Trainer

Follow Him:
Twitter: @erictastic
Instagram: erictastic

When did you start working out?:
When I was 21.

Eric 2

How many days a week do you work out?:
I do weights 5 days a week and I do cardio 6 days a week.

How long is your average workout?:
Usually 90 min

Favorite muscles to exercise:
Legs

Least favorite muscles to exercise:
Legs. lol

Eric 3

Do you have any fitness goals? If so, what are they?:
I’m constantly trying to better myself and my symmetry, and I’m currently competing for my IFBB Pro Card.

Do you have any fitness inspirations? If so, who are they?:
Jaco De Bruyn

What supplements do you take or recommend?:
I think people misunderstand what supplements are for. They are intended to supplement any areas that your diet is lacking. I tend to only take supplements when I’m dieting down so that I still get the nutients that I’m lacking.

Eric 4

Can you give a brief overview of your diet?:
It’s constantly changing, so that I won’t plateau. It generally consists of around 45-50% of kilocalories from carbs, 30-35% of kcal from proteins, and 15-20% of kcal from fats.

Do you have any workouts that you specifically like, that you believe are very affective?:
You can’t have a good physique if you focus too much on one thing. Variety is the spice of life when it comes to me working out. I have lately been obsessed with lateral raise drop sets though.

Do you have any tips for people who are trying to reach their fitness goals?:
Keep with it. Consistency is the magic ingredient!

Do you have any other things you would like to say?(Comments, suggestions, etc)?:
I get a lot of questions from people who have all sorts of strange ideas of things they’ve heard… I think the biggest misnomer that people have is that low carb is always the way to go. If you’re looking to build muscle, you can’t pack on muscle without eating carbs, and cutting them out actually makes gaining muscle pretty difficult.

BOSU Ball Squats

Bosu Ball Squat - Position 1

Bosu Ball Squat – Position 1

Want to tone your legs? Want to challenge yourself with something new… Try BOSU Ball Squats.

This exercise is excellent to activate all of the muscles in your upper legs and your core. It requires a lot of control and balance and is a bit harder than it looks. To perform a BOSU Ball Squat:

    1. Grab a BOSU ball and put the ball on the ground, leaving the flat surface up.
    2. Slowly place one foot at a time on the BOSU ball and stand up straight (You are now in Position 1).
    3. Slowly lower to a squat position by lowering your butt down and activating your quads (You are now in Position 2)
    4. Using your quads, hamstrings, and glutes, raise back up to a standing position (You should now be back in Position 1).
    5. Repeat for the recommended amount of reps (usually 12-20).
Bosu Ball Squat - Position 2

Bosu Ball Squat – Position 2

Tips:

    1. Remember, when doing squats, the general rule is “Ass to Grass!” Lower your butt down as far as you can. This full range of motion will help build and tone your legs muscles.
    2. In order to balance, really activate your core. This exercise is more than just a leg workout!
    3. Once you become comfortable, you can add a barbell to make the exercise harder. Rest the barbell behind your head on your shoulders and perform the exercise with this added weight. WARNING: Do not try to squat the same amount of weight on the BOSU ball that you normally do on the flat ground. Start off small and add weight slowly. You will be surprised how much harder the squat becomes on the BOSU ball.
    4. BE CAREFUL!!! It is easy to fall off the ball. If you need to, perform this exercise next to a wall or something else that you can hold to maintain your balance. Try and do the exercise without brasing yourself, but hold something when necessary… Safety is always the most important thing when exercising!

Do you like this exercise? Do you have any other exercises you would like to share? Any questions or comments? Contact me at corestrengthalec@gmail.com

A Better Way To Eat Almonds

Did you Know…

You can get more out of your almonds by soaking them in water.

Almonds are one of my go to foods to snack on because they are high in protein, fatty acids, omega-3 and fiber. Almonds are also considered a Superfood because of the high levels of Vitamin E, Antioxidants, and they help curve your hunger. After doing some research I found out that soaking almonds actually helps you absorb more of the nutrients the almonds have to offer, but how?

Almonds2

The brown skin on an almond protects it until the correct levels of sunlight and moisture allow it to germinate. Because of this, eating an almond without allowing it to get proper moisture makes it harder to digest. When the almond is soaked; however, the outer brown skin is penetrated and the almond releases enzymes. When eating an almond that has been allowed to take in such moisture, you are able to digest the almond more efficiently and absorb the healthy nutrients the almond has to offer.

How to soak an Almond:
This is very easy. It is recommended to put the almonds in a bowl of purified water. Cover the almonds with 2 cups of water per 1/2 cup of almonds. Soak the almonds in the bowl overnight (10-12 hours). After the 10-12 hours, drain the almonds and eat or store them. You can store the almonds in the refrigerator for about one week. The almonds are soft, sweet, and they taste great!

Apparently, if you would like to sprout your almonds, simply soak you almonds overnight and place them in a glass jar with a lid in the refrigerator. After a few days, the almonds should begin to sprout (about 1/8-inch sprout should show). A sprouted almond can be more beneficial than a soaked almond because they are easier to digest and they also release lipase (an enzyme that helps digest fat). I have not tried this, but would like to very soon. If you have, please let me know what you think!

Do you like this post? Do you have any other ideas for posts? If you have any questions or comments please email me at corestrengthalec@gmail.com!