Full Circle Fire Hydrants

Circle Fire Hydrants: Step 1

Circle Fire Hydrants: Step 2

Circle Fire Hydrants: Step 3

Circle Fire Hydrants: Step 4

Circle Fire Hydrants: Step 5

To be honest, I don’t know what to call this exercise because I made it up about a year ago and I have been doing it ever since. I took an exercise called ‘The Fire Hydrant’ and basically made it more complicated so I could target all areas of my glutes. I decided to use the name ‘Full Circle Fire Hydrants’ because you follow a circle pattern with your leg during the exercise. It may look easy, but if done correctly, your glutes will be on fire.

To Perform FULL CIRCLE FIRE HYDRANTS:
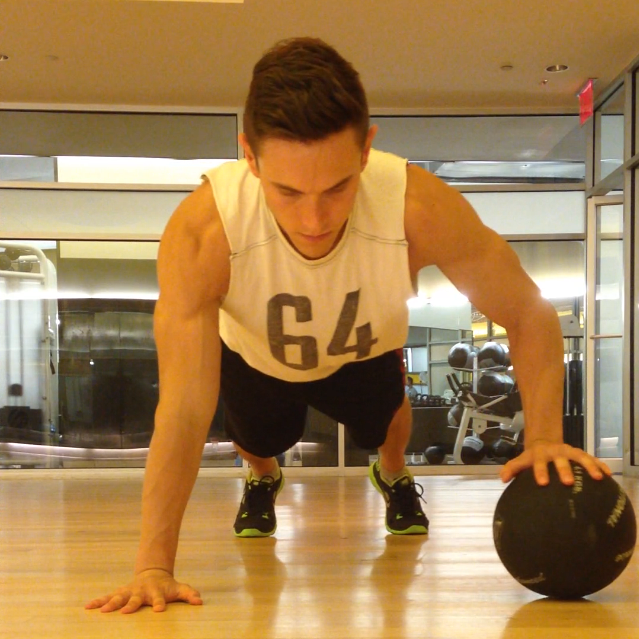
1. Start with your hands and knees both on the floor. Create a table top with your back and keep your hands and knees both shoulder width apart. (Picture 1)
2. With your left knee and both hands on the ground, lift your right knee and pull it into your chest. Crunch your torso toward the knee and contract your core. (Picture 2)
3. Now rotate your hip to raise the knee to your right side. Your knee should still be bend and your leg should be parallel to the ground. (Picture 3)
4. Extend and straighten your right leg keeping it parallel to the floor. (Picture 4)
5. Slowly move your leg toward the back. Your leg should be behind you now. (Picture 5)
6. Bend the right leg and return your right knee to your chest. Crunch your body toward your knee and contract your core. (Picture 2)
7. Repeat steps 3-7 for the allotted amount of reps (I usually do 10), and then repeat on the other side.

TIPS:
1. This exercise is all about form. Do not compromise form!
2. Hold each position of the leg for one second before moving onto the next step. Each movement should be nice and controlled.
3. Keep your shoulders square. It is ok to bend your elbows during this exercise if you need more stabilization, but do not twist your shoulders.
4. When I bring my knee to my chest (Step 2), I like to crunch toward my knee. Tighten your core and breathe out while your knee is in this position to give you abs a nice squeeze.
5. When extending your knee to the side (Step 4), keep your leg turned in. Some people may want to twist their leg so their knee faces the ceiling, but your knee should be facing forward.
6. After bringing your leg behind you (Step 5), it is good if you can raise your leg past parallel. Raise your leg as high as you can without bending your knee. You should feel a nice squeeze in your glutes.

Do you think you may try this exercise next time you are at the gym? If you do, let me know what you think of it. Do you have any questions, comments, or any ideas for other topics? Contact me at corestrengthalec@gmail.com

One Arm Medicine Ball Pushups

One Arm Med Ball Pushup: Step 1

One Arm Med Ball Pushup: Step 2

One Arm Med Ball Pushup: Step 3

One Arm Med Ball Pushup: Step 4

Do you want a new chest exercise that will really stretch and activate your pecs? This exercise activates all areas of your chest, works on your stabilization skills, and also gives your pecs a nice pull allowing your muscles to lengthen and grow.

To perform a One Arm Medicine Ball Pushups:
1. Start in a Pushup Plank Position with one hand on the floor and one hand on top of a medicine ball.
2. Lower into a pushup keeping one hand on the medicine ball.
3. Return to the Pushup Plank Position.
4. Roll the ball to the opposite hand and repeat the exercise.
5. Continue rolling the ball from one hand to the other with a pushup in between. I like to do 10 reps (20 pushups, 10 on the right, 10 on the left).

TIPS:
1. Activate your core in order to stabilize your body. When lowering into the push position, you should not tip to one side or droop your body to the floor.
2. Your chest should be parallel to the floor. If you tilt your shoulders, your chest will no longer be parallel and you will not be using the correct muscles during the exercise. (In the second picture, my shoulders are a little lopsided. Try to avoid this positioning and aim for a more parallel look like the positioning I achieved in the third picture. Form is important for this and every exercise).
3. Your feet can be wide, shoulder width apart, or together. The closer your feet are, the more your core will need to activate to stabilize your body.
4. I like to alternate sides during the exercise, rolling the ball to the opposing hand between each pushup. Other people may recommend doing all 10 pushups on one side, and then switching to the other hand to do the other 10. Either way works well, I just find continuously alternating makes the exercise more challenging because you are constantly shifting your weight and positioning.

Do you enjoy this workout? Do you have any other chest workouts that may be helpful? Contact me at corestrengthalec@gmail.com with any questions, comments, or ideas for other blog topics.

Coconut Turkey Bacon

It may sound weird to some of you, but I promise that it is delicious. If you like Coconut and you like Turkey Bacon, then you will LOVE this recipe. I will admit right now, it is not the healthiest snack you can have, but can make for a nice treat once when you are really craving something both sweet and savory.

Coconut Turkey Bacon

Ingredients:
8 Turkey Bacon Strips
3 oz. of Shredded Coconut
2 tbsp. of Coconut Oil
1 egg

Directions:
1. Crack 1 egg in a bowl and stir with a whisk or fork.
2. Place the shredded coconut on a large plate and spread it out evenly.
3. Oil a frying pan using 2 tbsp. of coconut oil and put the frying pan on the stove top at low-medium heat.
4. Coat one strip of turkey bacon at a time with the egg that was mixed in the bowl. This can easily be done by dipping the entire turkey bacon strip in the bowl.
5. Place the coated turkey bacon strip on the plate with the shredded coconut. Coat the strip on both sides with shredded coconut.
6. Place the turkey bacon strip on the frying pan and let it sit for about 1 minute. After one minute, flip the turkey bacon strip and cook for an additional minute. The reason we do not fry the bacon for too long is because the coconut will easily blacken if cooked too long. We want the coconut to be golden brown.
7. Remove the strip from the frying pan and place it on a plate that is covered by a paper towel.
8. Continue the process from step 4-7 for the other 7 pieces of turkey bacon. Once you have finished cooking all of the pieces, you should have 8 coconut coated, turkey bacon strips on one plate.
9. Place a paper towel over the turkey bacon and put the plate in the microwave. Cook on high for 2-3 minutes or until the turkey bacon has a consistency you like.
10. Let the plate cool and ENJOY!

Do you like this recipe? Do you have any recipes you would like to share? Email me at corestrengthalec@gmail.com with any questions, comments, or ideas for new topics.