LEGS LEGS LEGS

Want a good way to build and tone your legs without having to lift heavy weights? Yesterday I put together and tried a workout for the first time, and although it was hard, it worked great. The important part of this workout is to really monitor your rest time. If you go light, but take small rests between each set, you will be working your muscles in an effective way. Try this workout and let me know what you think!

LEGS LEGS LEGS

  1. Cardio:
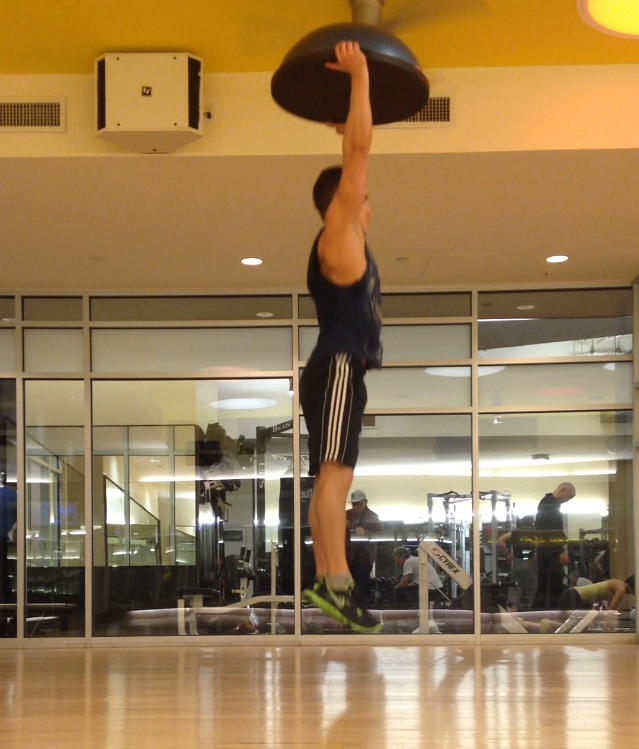
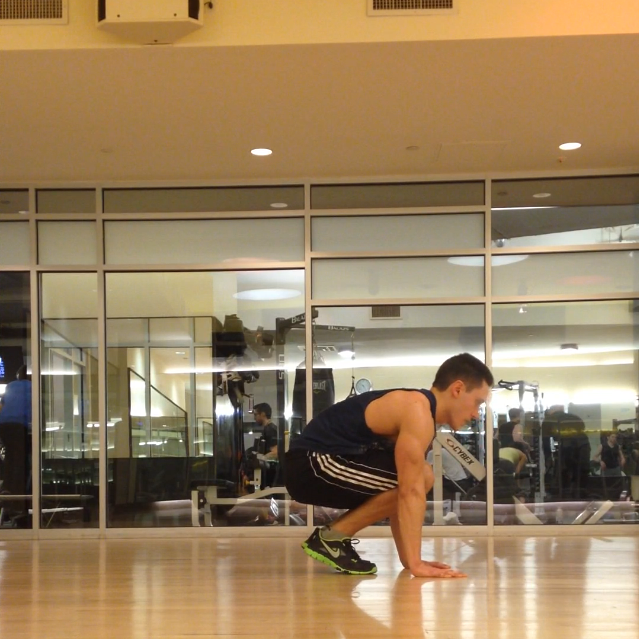
    1. 10 Sets of 10 weighted Box Jumps (1 minute rest between each set)
  2. Strength:
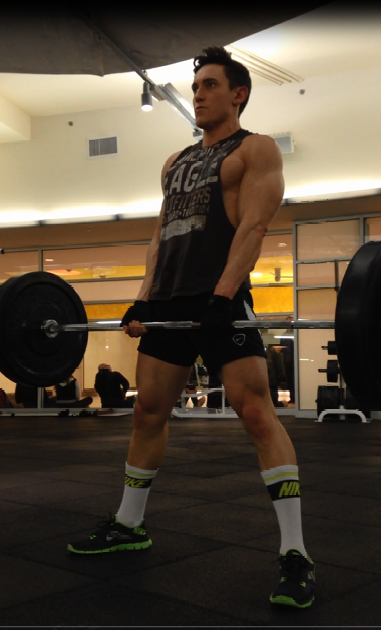
    1. Superset of Squats and Deadlifts.
      1. 10 Sets: 10 Back Squats, 45 Minute Rest, 10 Deadlifts, 1 Minute Rest, Repeat
  3. Tone:
    1. 5 sets of Leg Extensions (10 reps)
    2. 5 Sets on the Thigh Abductor Machine (15 reps)
    3. 3 sets of 20 Jumping Lunges
  4. Stretch

This was the entire workout that I did and now my legs are SORE! It was a great way to change up my normal workout. Below are some tips on how to perform these exercises correctly and find weights that would work well for you.

TIPS:

  1. For the Weighted Box Jumps, I used a 24″ box and held a 16kg Kettle Bell. When doing this exercise, I really made sure to get my squat down as low as possible before jumping to the box. If you are not comfortable with weighted box jumps, start with no weight at all, or if you are just learning box jumps, start with a smaller height.
  2. The insane Squat and Deadlift Superset is the big strength portion of this workout. I used 135lbs for both exercise and I was exhausted. My max weights for both my squat and deadlift are over 300lbs, so DON’T go heavy with this superset. Choose a weight that you feel comfortable doing 20-25 reps with in a normal set (usually 50% of your max weight or less). Start with 10 squats, wait 45 seconds, do 10 deadlifts, wait 1 minute, and then repeat this cycle starting with the 10 squats again for 9 more sets. 10 full sets will take about 30 minutes. Make sure to get low with your squats and also really keep the tension out of your back for both exercises.
  3. For the toning exercises, I really just wanted to exhaust some of my leg muscles. Trying to only keep about a 60 second rest in between each set,  I did leg extensions, abductors, and jumping lunges. By the end of this workout I was drenched in sweat and my legs were numb.

Let me know what you think of this workout. Were you able to do the whole thing? Did you make any changes that worked well for you? Contact me at corestrengthalec@gmail.com with any questions, comments, or ideas or new topics.

Narrow Squats

Narrow Squat 1

This is a move I just started adding to my leg day routine, and it kills my legs! You will feel your quads, glutes, and hamstrings burn and swell. This move may feel weird at first, but once you start understanding the mechanics and form, it is a great exercise to add to your leg routine.

To do a Narrow Squat:
1. With a bar set on the squat rack, load the bar with the appropriate amount of weight.
2. With the bar resting on your traps (lower neck/upper back), lift the bar off the squat rack
3. Set your feet slightly closer than shoulder width apart, but not completely together.
4. Keeping your back straight, squat down. (As seen in the second picture)
5. When you are as low as you can get, push through your heels to return back to the standing position.
6. Repeat steps 4-5 for the allotted amount of reps.

Narrow Squat 2

TIPS:
1. Be careful of your knees during this exercise. During the entire movement of the squat your knees should stay in line. Make sure they do not start moving in toward each other. If they do, this will easily cause injury. When pushing up, I try to focus on pushing me knees slightly out to avoid them from caving in toward each other.
2. This is another exercise that is all about control and less about weight. Although the resistance of the weight is important, if you can control the movement of the exercise and perform this squat with slow, but strong movements, you will definitely feel and see a change in your legs.
3. When squatting, try to get your legs to at least make a 90 degree angle, but lower even more toward the floor if you can. A wider range of motion will cause your legs to work harder which will then lead to more strength gains. If you cannot lower to create a 90 degree angle, you may be lacking flexibility in your hips. Stretching regularly will help alleviate this issue.
4. Push through your heels to activate your hamstrings and give your movement more support and power.
5. I recommend starting this exercise with a very small amount of weight to get the movement down first. Once you have gotten used to the motion, slowly add on weight to see what weight is challenging, but still comfortable for you. You will probably not do the same weight you use for your normal squat. Right now, for my narrow squat I do about 5 sets of 10 reps 185lbs, while for my standard squat I can do 10 reps of 185-225lbs, and my max squat is 330lbs.
6. As you can see from my picture, my feet are turned out. Growing up as a dancer and also being bow Legged, my legs are more comfortable in the position. When I put my feet straight forward and parallel to each other, I feel a lot of pressure on my knees. Try to have your feet straight on, but also know your body and its limits. If you need to turn out your feet as well, do so.

Have you ever tried a narrow squat? If you add narrow squats to your leg routine, let me know what you think. Contact me at corestrengthalec@gmail.com with any questions, comments, or ideas for new topics!

Sumo Deadlift

Similar to a standard deadlift, the Sumo Deadlift helps build and strengthen your legs and back muscles. Most of the strength should come from your hamstrings, glutes, and adductors, but muscles in your core, back, and forearms are also needed for stabilization and grip strength.
Sumo Deadlift
To perform the Sumo Deadlift:
1. Place a bar on the ground and load it with the appropriate amount of weight.
2. With the bar below you, set your feet in a wide stance. The bar should be touching your shins.
3. Bend at the hips and grab the bar. Your hands should not be wider than shoulder width apart. Contrary to a standard deadlift, your hands should be between your feet, not on the outside of your feet.
4. Lower your hips slightly and keep you chest up. Have a tight grip on the bar and activate your lats. You are now in the correct position for the sumo deadlift.
5. By pushing through your heels and activating your hamstrings and glutes, pull the bar up off of the floor. The motion should be coming mostly from your hips.
6. Once the bar is past your knees, drive you hips forward and lean slightly back. At the peak of the lift, you should be squeezing your glutes with your legs straight, and your lats should be activated with shoulder blades together.
7. To lower the bar back to the ground, hinge at the hips. Keep your back activated and control the motion down as much as you can.
8. Repeat steps 5-7 for the allotted amount of the reps.

Sumo Deadlift 2
TIPS:
1. The amount of weight all depends on your progress with weighlifting. For beginners, start off with just the bar to work on your form, and then add weights slowly.
2. Lower your hips slightly and keep you chest up. You do not want to be hunched over.
3. Any variation of a deadlift can be dangerous is not done correctly which is why form is so important. Really push through your heels and keep as much strain out of your lower back as possible.
4. At the peak of the lift, hold the position for a second and really feel the nice squeeze in your glutes and hamstrings.

Have you ever tried Sumo Deadlifts? Let me know what you think! Contact me at corestrengthalec@gmail.com with questions, comments, or ideas for other topics.

Quick Killer Leg Workout

Quick Killer Leg Workout February 2015 1

Yesterday my friend Ramin and I were short on time, but we wanted to get in a good leg workout. This is what we did in just a little over an hour, and trust me, this morning I am feeling it!

Our 1 Hour Leg Workout:

  • 6 sets of Hack squats (2 Warm Up sets, 4 Working sets)
  • 6 sets of Leg Press (2 Warm Up sets, 4 Working sets)
  • 4 Sets of Seated Leg Curls (1 Warm Up set, 3 Working sets)
  • 4 Sets of Glute Master/Butt Blaster Machine (1 Warm Up set, 3 Working sets)
  • 4 Sets of Goblet Squats (15 Reps at a moderate weight)
  • Pistol Squat Variations
  • Stretch


  • Quick Killer Leg Workout February 2015 2 TIPS:
    1. During our Warmup sets, we would do a light weight (about 50% of our max) and do about 15 reps. During a Working set, we would do a much heavier weight (75-90% of our max) and do anywhere from 6-10 reps or until failure.
    2. The important part of this workout is to not take very long breaks. In between each set, maybe take a minute to rest and then get back into it. You really want your muscles to be working hard the entire time.
    3. We ended up doing a Superset of the Seated Leg Curls and the Glute Master Machine. During a Superset, you do one exercise and immediately go to the other exercise, then rest after you finish doing both. This will keep you heart rate up and keep those leg muscles activated.
    4. For the Pistol Squat variations you can do whatever makes you comfortable. I was practicing my Pistol Squats on a Bosu Ball and I was doing walking Pistol Squats; however if you are not comfortable doing them, you can try doing Pistol Squats holding a TRX or even a chair or rail. Do something that makes you comfortable, but also challenges you.
    5. Do not forget to stretch, especially on leg day. You need to lengthen the muscles fibers and release some of the tension and lactic acid, otherwise you will not be able to walk tomorrow.

    Hope you liked this quick, but intense leg workout. Let me know if you end up trying it! Are there any other workouts you would like for me to post? Do you have any other ideas for topics? Let me know by contacting me at corestrengthalec@gmail.com

    Scissor Jumps (Jumping Lunges)

    Scissor Jumps 2

    Scissor Jumps are one of my least favorite exercises to do on legs day because of how badly they can burn. But as they say, NO PAIN, NO GAIN! Because of the high repetition, Scissor Jumps get your heart rate up and add a bit of intense cardio to your leg workout while also toning and building your quads, hamstrings, and glutes. Scissor jumps are a great complex movement that anyone of any fitness level can add to their workout routine.

    CLICK HERE TO SEE HOW THE EXERCISE IS DONE

    To Perform Scissor Jumps:
    1. Start in a lunge position with one foot forward and your knee bent so that it is over the foot, with the other foot behind you and that knee bent and almost touching the ground.
    2. Pushing off the heel of your front foot and the toe of the back foot, jump up.
    3. While you are jumping, switch the position of your legs.
    4. When landing you should land in a lunge position again, however your starting front foot should now be in the back, and the foot that started in the back should now be in the front.
    5. Repeat Steps 2-4 for the allotted amount of reps.

    CLICK HERE TO WATCH A VIDEO OF THIS EXERCISE BEING DONE BY RAMIN KARIMLOO

    Scissor Jumps

    TIPS:
    1. For people new to this exercise, you can swing your arms to help with the lift of the jump.
    2. When landing, always land with bent knees. This will help absorb some of the shock from the landing and help avoid any joint injuries.
    3. This exercise is to be done at a quicker pace. Although you would definitely feel a burn with more controlled motions, we also want to get our heart rates up.
    3. I aim to do about 5 sets of 40 reps of this exercise with about a minute rest in between each set.
    4. To make this exercise more difficult, try doing it without swinging your arms at first, and then try doing this exercise while holding a weight. As you can see in the pictures, last time I did this exercise I held a 45lb plate and it killed my legs!
    5. When doing this exercise with a weight, add a slight twist to your body (emphasis on SLIGHT… no need to throw your back out). This will help activate your obliques. The weight will not only make the jump harder on your legs since you will be pushing more than your body weight, but you also will be testing your core stabilization.

    Have you tried adding Scissor Jumps into your workout routine? Do you have any other leg exercises that really burn? Contact me at corestrengthalec@gmail.com with questions, comments, or ideas for new topics.

    Full Circle Fire Hydrants

    Circle Fire Hydrants: Step 1

    Circle Fire Hydrants: Step 2

    Circle Fire Hydrants: Step 3

    Circle Fire Hydrants: Step 4

    Circle Fire Hydrants: Step 5

    To be honest, I don’t know what to call this exercise because I made it up about a year ago and I have been doing it ever since. I took an exercise called ‘The Fire Hydrant’ and basically made it more complicated so I could target all areas of my glutes. I decided to use the name ‘Full Circle Fire Hydrants’ because you follow a circle pattern with your leg during the exercise. It may look easy, but if done correctly, your glutes will be on fire.

    To Perform FULL CIRCLE FIRE HYDRANTS:
    1. Start with your hands and knees both on the floor. Create a table top with your back and keep your hands and knees both shoulder width apart. (Picture 1)
    2. With your left knee and both hands on the ground, lift your right knee and pull it into your chest. Crunch your torso toward the knee and contract your core. (Picture 2)
    3. Now rotate your hip to raise the knee to your right side. Your knee should still be bend and your leg should be parallel to the ground. (Picture 3)
    4. Extend and straighten your right leg keeping it parallel to the floor. (Picture 4)
    5. Slowly move your leg toward the back. Your leg should be behind you now. (Picture 5)
    6. Bend the right leg and return your right knee to your chest. Crunch your body toward your knee and contract your core. (Picture 2)
    7. Repeat steps 3-7 for the allotted amount of reps (I usually do 10), and then repeat on the other side.

    TIPS:
    1. This exercise is all about form. Do not compromise form!
    2. Hold each position of the leg for one second before moving onto the next step. Each movement should be nice and controlled.
    3. Keep your shoulders square. It is ok to bend your elbows during this exercise if you need more stabilization, but do not twist your shoulders.
    4. When I bring my knee to my chest (Step 2), I like to crunch toward my knee. Tighten your core and breathe out while your knee is in this position to give you abs a nice squeeze.
    5. When extending your knee to the side (Step 4), keep your leg turned in. Some people may want to twist their leg so their knee faces the ceiling, but your knee should be facing forward.
    6. After bringing your leg behind you (Step 5), it is good if you can raise your leg past parallel. Raise your leg as high as you can without bending your knee. You should feel a nice squeeze in your glutes.

    Do you think you may try this exercise next time you are at the gym? If you do, let me know what you think of it. Do you have any questions, comments, or any ideas for other topics? Contact me at corestrengthalec@gmail.com

    Rolling Pistol Squats

    Rolling Pistol Squat: Step 1

    Rolling Pistol Squat: Step 2

    Rolling Pistol Squat: Step 3

    Rolling Pistol Squat: Step 4

    Rolling Pistol Squat: Step 5

    One of the benchmark exercises to do in any CrossFit gym is a Pistol Squat. Pistol Squats involve only using one leg to squat down and push back up to the standing position. This exercise is very difficult and requires a lot of practice and strength to complete. Rolling Pistol Squats are an easier variation of the standard Pistol Squat because they allow you to use momentum to your advantage. Rolling Pistol Squats are also a great cardio and full body workout.

    To Perform a Rolling Pistol Squat:
    1. Start in the standing position with both feet on the floor.
    2. Squat down with your glutes as close to the floor as possible and create a comfortable curve in your back to prepare to roll backward.
    3. Roll backward onto your back and raise your legs in the air.
    4. Using the momentum of throwing your legs forward, place one foot on the ground as close to your glutes as possible with the other leg straight out in front of you and stand up.
    5. Once standing, put the leg that is straight out in front of you back down to return to the standing position.
    6. Repeat the exercise from Step 2 and alternate legs with each rep.

    TIPS:
    1. When I roll backward, I like to keep my legs straight and bring my legs as close to my chest as I can. I give them a light pull with my hands and this allows me to give my hamstrings a stretch.
    2. The closer you can place your foot to you glutes when you role forward, the easier it will be to stand up.
    3. Momentum is key! Quickly bring your legs forward to make the push up from the floor easier.
    4. For anyone with a knee or hip injury, any variation of a pistol squat is not recommended. Never do a workout that causes you pain. Listen to your body!
    5. Rolling Pistol Squats are great to help tone your legs, but they also wok your core and provide a good cardio workout as well. I like to use Rolling Pistol Squats in between other exercises to keep my heart rate up. I usually do about 16 reps per set (8 on each leg), and about 3-5 sets during my workout.

    Have you ever tried Rolling Pistol Squats? Do you plan on adding these to your workout routine? I really appreciate any feedback. Contact me at corestrengthalec@gmail.com.

    Jump Squats

    Time to get our butts in shape for summer, LITERALLY. I personally can get bored with traditional cardio, so I try to integrate some High Intensity Interval workouts that not only provide a great cardio exercise, but also help tone your muscles. Jump squats are a great high intensity workout that target your entire lower body, especially your booty.

    Jump Squat: Jump

    Jump Squat: Squat

    To perform a Jump Squat:
    1. Start in a standing position with your feet about shoulder width apart.
    2. Squat down.
    3. From the squat position, jump up in the air and extend your legs. (Your feet should be a few inches above the ground)
    4. Once you complete the jump, repeat the workout from step 2.

    Tips:
    1. When squatting down, get your glutes low to the floor. This will stretch and activate your muscles more effectively.
    2. While jumping, straighten your leg and tighten your quads. Work your leg muscles even in the jump of the exercise.
    3. When you return back to the ground, land through your toes and bend your knees. This promotes good form and prevents injury and joint discomfort.
    4. I either like to do 5 sets of 15 reps for this workout with 45 second breaks in between, or I use this workout to superset with another leg exercise (usually lunges).

    Are you getting your body in shape for the summer? Do you use Jump Squats in your routine? Contact me at corestrengthalec@gmail.com with questions, comments, or ideas for new topics.

    BOSU Burpees

    Back to BURPEES! I promised that I would show you other versions of Burpees and the one I am about to show you is one of my favorites. For this variation, you will need to use a BOSU ball. These BOSU Burpees intensify your workout by adding stability and resistance components to your burpee.

    To do a BOSU Burpee:
    1. Start in a standing position holding the BOSU Ball handles with the ball facing away from your body.
    2. Squat down and place the BOSU ball on the ground. (The flat side should be facing up and the ball side should be on the floor)
    3. Jump your feet back to put yourself in a plank position while still holding the BOSU ball handles.
    3a. Optional Pushup
    4. Jump your feet forward to return to the squat position.
    5. Raise the BOSU ball above your head.
    6. Jump up. While jumping, press the BOSU ball up toward the ceiling.
    7. Repeat from Step #1.

    Tips:
    1. If you are not familiar with Burpees, or forget some of the tips I have given to get the most out of these exercises, check out my ‘How to do a Burpee’ Post before trying this more difficult variation of the exercise. It is important to understand the body mechanics of the basic exercise before trying more difficult variations in order to prevent injury.
    2. Remember, when squatting down, try and get your glutes low to the floor.
    3. Activate your core while in the plank position. The BOSU Ball will add an additional stability aspect to the exercise which will require more core strength and activation than the Basic Burpee.
    4. When jumping during this exercise, you also press the BOSU Ball up toward the ceiling. Adding the BOSU ball will not only add weight to your jump making the jump more difficult, but it will also help tone your shoulders while pressing the BOSU Ball up.

    Bosu Burpee: Step 1

    Bosu Burpee: Step 1

    Bosu Burpee: Step 2

    Bosu Burpee: Step 2

    Bosu Burpee: Step 3

    Bosu Burpee: Step 3

    Bosu Burpee: Step 3a (optional pushup)

    Bosu Burpee: Step 3a

    Bosu Burpee: Step 3a (finish optional pushup)

    Bosu Burpee: Step 3a

    Bosu Burpee: Step 4

    Bosu Burpee: Step 4

    Bosu Burpee: Step 5

    Bosu Burpee: Step 5

    Bosu Burpee: Step 6

    Bosu Burpee: Step 6


    Do you any variations of Burpees that you like to include in your workout routine? Contact me at corestrengthalec@gmail.com for any questions, comments, or ideas for new topics.

    How to do a Burpee!

    BURPEES! You love them and you hate them.
    Burpees are an amazing cardio workout and work many of your major muscle groups. Burpees are one of the best full body workouts you can do in your exercise routine, however it is also easy to do a burpee incorrectly, making the exercise not as effective.

    To do a Basic Burpee:
    1. Start in a standing position
    2. Squat down and place your hands on the ground.
    3. Jump your feet back to put yourself in a plank position.
    4. Jump your feet forward to return to the squat position.
    5. Jump up straight off the floor from the squat position.
    6. Repeat from Step #1

    There are many variations of Burpees. The most common variation is the Burpee Pushup where one pushup is done while in the plank position. (Between steps #3 and #4 of the Basic Burpee instructions, do a pushup).

    Tips:
    1. When squatting down, try and get your glutes low to the floor. This will make the exercise seem harder, but that is because you are activating most of the muscles in your legs from your quads, to your glutes and hamstrings. This muscle activation will help tone your legs more effectively.
    2. While in the plank position, make sure to keep your body completely flat and activate your core. It is very easy to raise you hips and glutes up toward the ceiling.
    3. When jumping during this exercise, and in any other exercise, land with bent knees. If you jump and land with your legs completely straight, you will put too much pressure on your knees and lead to injuries in the future.
    4. Burpees can be done as a FT workout (For Time) or AMRAP workout (As Many Reps As Possible). If you do a FT workout, give yourself a certain number of burpees to do and see how much time it takes you to complete the workout. If you choose to do an AMRAP workout, give yourself an amount of time, usually a minute or two, and see how many burpees you can do in the time allotted.

    Burpee: Step 3

    Burpee: Step 3

    Burpee: Step 2

    Burpee: Step 2

    Burpee: Step 1

    Burpee: Step 1

    Burpee: Step 5

    Burpee: Step 5

    Burpee: Step 4

    Burpee: Step 4

    Burpee: Step 3a (optional pushup)

    Burpee: Step 3a (optional pushup)

    Burpee: Step 6

    Burpee: Step 6

    Do you include Burpees into your workout? Do you have any variations that you would like to share? Contact me at corestrengthalec@gmail.com for any questions, comments, or ideas for new topics.