Narrow Squats

Narrow Squat 1

This is a move I just started adding to my leg day routine, and it kills my legs! You will feel your quads, glutes, and hamstrings burn and swell. This move may feel weird at first, but once you start understanding the mechanics and form, it is a great exercise to add to your leg routine.

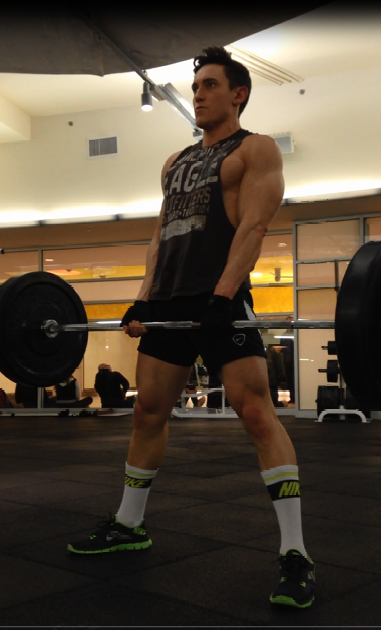
To do a Narrow Squat:
1. With a bar set on the squat rack, load the bar with the appropriate amount of weight.
2. With the bar resting on your traps (lower neck/upper back), lift the bar off the squat rack
3. Set your feet slightly closer than shoulder width apart, but not completely together.
4. Keeping your back straight, squat down. (As seen in the second picture)
5. When you are as low as you can get, push through your heels to return back to the standing position.
6. Repeat steps 4-5 for the allotted amount of reps.

Narrow Squat 2

TIPS:
1. Be careful of your knees during this exercise. During the entire movement of the squat your knees should stay in line. Make sure they do not start moving in toward each other. If they do, this will easily cause injury. When pushing up, I try to focus on pushing me knees slightly out to avoid them from caving in toward each other.
2. This is another exercise that is all about control and less about weight. Although the resistance of the weight is important, if you can control the movement of the exercise and perform this squat with slow, but strong movements, you will definitely feel and see a change in your legs.
3. When squatting, try to get your legs to at least make a 90 degree angle, but lower even more toward the floor if you can. A wider range of motion will cause your legs to work harder which will then lead to more strength gains. If you cannot lower to create a 90 degree angle, you may be lacking flexibility in your hips. Stretching regularly will help alleviate this issue.
4. Push through your heels to activate your hamstrings and give your movement more support and power.
5. I recommend starting this exercise with a very small amount of weight to get the movement down first. Once you have gotten used to the motion, slowly add on weight to see what weight is challenging, but still comfortable for you. You will probably not do the same weight you use for your normal squat. Right now, for my narrow squat I do about 5 sets of 10 reps 185lbs, while for my standard squat I can do 10 reps of 185-225lbs, and my max squat is 330lbs.
6. As you can see from my picture, my feet are turned out. Growing up as a dancer and also being bow Legged, my legs are more comfortable in the position. When I put my feet straight forward and parallel to each other, I feel a lot of pressure on my knees. Try to have your feet straight on, but also know your body and its limits. If you need to turn out your feet as well, do so.

Have you ever tried a narrow squat? If you add narrow squats to your leg routine, let me know what you think. Contact me at corestrengthalec@gmail.com with any questions, comments, or ideas for new topics!

Sumo Deadlift

Similar to a standard deadlift, the Sumo Deadlift helps build and strengthen your legs and back muscles. Most of the strength should come from your hamstrings, glutes, and adductors, but muscles in your core, back, and forearms are also needed for stabilization and grip strength.
Sumo Deadlift
To perform the Sumo Deadlift:
1. Place a bar on the ground and load it with the appropriate amount of weight.
2. With the bar below you, set your feet in a wide stance. The bar should be touching your shins.
3. Bend at the hips and grab the bar. Your hands should not be wider than shoulder width apart. Contrary to a standard deadlift, your hands should be between your feet, not on the outside of your feet.
4. Lower your hips slightly and keep you chest up. Have a tight grip on the bar and activate your lats. You are now in the correct position for the sumo deadlift.
5. By pushing through your heels and activating your hamstrings and glutes, pull the bar up off of the floor. The motion should be coming mostly from your hips.
6. Once the bar is past your knees, drive you hips forward and lean slightly back. At the peak of the lift, you should be squeezing your glutes with your legs straight, and your lats should be activated with shoulder blades together.
7. To lower the bar back to the ground, hinge at the hips. Keep your back activated and control the motion down as much as you can.
8. Repeat steps 5-7 for the allotted amount of the reps.

Sumo Deadlift 2
TIPS:
1. The amount of weight all depends on your progress with weighlifting. For beginners, start off with just the bar to work on your form, and then add weights slowly.
2. Lower your hips slightly and keep you chest up. You do not want to be hunched over.
3. Any variation of a deadlift can be dangerous is not done correctly which is why form is so important. Really push through your heels and keep as much strain out of your lower back as possible.
4. At the peak of the lift, hold the position for a second and really feel the nice squeeze in your glutes and hamstrings.

Have you ever tried Sumo Deadlifts? Let me know what you think! Contact me at corestrengthalec@gmail.com with questions, comments, or ideas for other topics.

Svend Press

Svend Press 1

Yes you read the title correctly; this exercise is actually called the Svend Press. The Svend Press is my favorite exercise to target my inner chest. The movement requires you to flex your chest why pressing a plate.

To do a Svend Press:
1. Hold a plate between your hands. Your hands should be on the flat side of the plate, therefore you will have to press your hands against the plate to hold it.
2. Extend your arms and press the plate forward.
3. Bend your elbows and bring the plate in front of your chest.
4. Repeat steps 2-3 for the allotted amount of reps.

Svend Press 2

TIPS:
1. Keep your chest activated during the entire exercise. When you press against the plates with your hands, you will feel a nice contraction in your inner chest.
2. You can press one plate or multiples plates at the same time. In the pictures, I am holding two 5lbs plates.
3. Make sure to keep your shoulders back and really squeeze your chest when your arms extended.
3. I like to do this exercise standing up, but it also can be done lying down on a flat bench or on an incline bench.
4. You will not have to start with a very heavy weight. I currently only use 10-20lbs to do this exercise.
5. Slower controlled motions will make this exercise more effective. Fast pulsing motions will not activate all of the muscles in your chest and put a strain on your shoulders, defeating the purpose of the exercise.
6. Try aiming to do 10-15 reps of the exercise per set. If you can easily go over 15 reps, increase the weight.

Watch a short video of the exercise being done by clicking here!

Have you ever tried a Svend Press? Let me know what you think! Contact me at corestrengthalec@gmail.com for more questions, comments, and ideas for new topics.

Scissor Jumps (Jumping Lunges)

Scissor Jumps 2

Scissor Jumps are one of my least favorite exercises to do on legs day because of how badly they can burn. But as they say, NO PAIN, NO GAIN! Because of the high repetition, Scissor Jumps get your heart rate up and add a bit of intense cardio to your leg workout while also toning and building your quads, hamstrings, and glutes. Scissor jumps are a great complex movement that anyone of any fitness level can add to their workout routine.

CLICK HERE TO SEE HOW THE EXERCISE IS DONE

To Perform Scissor Jumps:
1. Start in a lunge position with one foot forward and your knee bent so that it is over the foot, with the other foot behind you and that knee bent and almost touching the ground.
2. Pushing off the heel of your front foot and the toe of the back foot, jump up.
3. While you are jumping, switch the position of your legs.
4. When landing you should land in a lunge position again, however your starting front foot should now be in the back, and the foot that started in the back should now be in the front.
5. Repeat Steps 2-4 for the allotted amount of reps.

CLICK HERE TO WATCH A VIDEO OF THIS EXERCISE BEING DONE BY RAMIN KARIMLOO

Scissor Jumps

TIPS:
1. For people new to this exercise, you can swing your arms to help with the lift of the jump.
2. When landing, always land with bent knees. This will help absorb some of the shock from the landing and help avoid any joint injuries.
3. This exercise is to be done at a quicker pace. Although you would definitely feel a burn with more controlled motions, we also want to get our heart rates up.
3. I aim to do about 5 sets of 40 reps of this exercise with about a minute rest in between each set.
4. To make this exercise more difficult, try doing it without swinging your arms at first, and then try doing this exercise while holding a weight. As you can see in the pictures, last time I did this exercise I held a 45lb plate and it killed my legs!
5. When doing this exercise with a weight, add a slight twist to your body (emphasis on SLIGHT… no need to throw your back out). This will help activate your obliques. The weight will not only make the jump harder on your legs since you will be pushing more than your body weight, but you also will be testing your core stabilization.

Have you tried adding Scissor Jumps into your workout routine? Do you have any other leg exercises that really burn? Contact me at corestrengthalec@gmail.com with questions, comments, or ideas for new topics.

Push-up pattern with Dumbbells

I made up this exercise myself when I was testing out different push-ups to add to my chest workout. While messing around, I put together this push-up combination that destroys your pecs after a great chest day.
-> CLICK HERE AND WATCH THIS VIDEO TO SEE HOW TO PERFORM THIS PUSH-UP PATTERN EXERCISE

Pushup Pattern 1

To do the Push-up Pattern with Dumbbells
1. Get two Dumbbells and place them slightly wider than shoulder width apart on the ground with one plate of each dumbbell flat on the ground leaving the other plate flat-side up.
2. Start in a push-up position with your legs slightly apart and both hands on the left dumbbell.
3. Do a push-up with both hands on the left dumbbell, then a push-up with your left hand on the left dumbbell and right hand on the ground, then a push-up with your left hand on the left dumbbell and right hand on the right dumbbell.
4. Do a push-up with your left hand on the ground and your right hand on the right dumbbell, then finish with a push-up with both hands on the right dumbbell.
5. Reverse the pattern you just did to return back to having both hands on the left dumbbell. To do so, do a push-up with your right hand on the right dumbbell and your left hand on the ground, then a push-up with your right hand on the right dumbbell and left hand on the left dumbbell, and then one more push-up with your left hand on the left dumbbell and your right hand on the ground.
6. You should now be back at the starting position with both hands on the left dumbbell. Repeat the full pattern (steps 3-5) for the allotted amount of reps.

-> CLICK HERE AND WATCH ANOTHER VIDEO TO BETTER UNDERSTAND THE FORM AND PATTERN NEEDED TO PERFORM THIS EXERCISE CORRECTLY.

Pushup Pattern 2

TIPS:
1. This is an advanced push-up exercise. Before trying this push-up pattern, I suggest trying explosive push-ups first. To see how to do explosive push-ups, CLICK HERE
2. One full pattern of this exercise has 8 push-ups in it. 2 close hand push-ups, 2 wide push-ups, and 4 uneven push-ups. When doing this exercise I like to so 2 full patterns (16 push-ups) and then I take a minute to rest. I will do about 4 sets.
3. Make sure to keep a strong core when performing this exercise! Arching your back will compromise form and cause you to target the incorrect muscles.
4. To modify this exercise, you can use a shorter surface, such as an aerobic stepper or even a book. This exercise can also be done on your knees if using a shorter surface is still too difficult.
5. Focus on using your chest to do the push-up. Your pecs should be the primary muscle used in this exercise and will start to fatigue quickly. Your other muscles will naturally start to compensate, but really try and focus on using your pecs for most of the work.

Are you ready to try this push-up combination? Do you have any push-up variations that you like to add to your workout? Let me know and contact me at corestrengthalec@gmail.com with any questions, comments, or ideas for other topics.

Explosive Pushups with Dumbbells

Explosive Pushup 1

Explosive Pushup 2

Explosive Pushup 4

Explosive Pushup 3

I was recently asked to post more exercises that really target your chest. In the past few months, I started adding more pushup variations into my workouts and have noticed a significant change in the strength and size of my pecs. This exercise destroys my chest at the end of a great workout. Explosive Pushups with Dumbbells test your upper body strength and allow you to use all areas of your chest in one exercise.

To do Explosive Pushups with Dumbbells:
1. Take two dumbbells and lay them upright on the ground. (One side of the dumbbells should be flat on the floor, and the other side should be up in the air, leaving a flat surface at the top)
2. Start in a raised plank position with your feet on the floor and one hand on each dumbbell. *Image 1
3. Bend your elbows and lower your body toward the floor. *Image 2
4. As you push up, lift your hands off the dumbbells. Now your feet should be the only part of your body touching the floor.
5. As your body starts to lower back down to the ground, land with your hands on the floor between the dumbbells. *Image 3
6. Bend your elbows and lower your body toward the floor. *Image 4
7. As you push up away from the floor, lift you hands off the floor and try to place them back on top of the dumbbells.
8. End in a raised plank position with a slight bend in your elbows, your feet on the floor and one hand on each dumbbell.
9. Repeat steps 3-8 for the allotted amount of reps.
Click Here to watch a short video to see an example of Explosive Pushup with Dumbbells.

TIPS:
1. Do not arch your back. During the explosive motion you may want to arch your back to get your chest higher and get your body higher off the ground. By keeping your body straight, it may seem harder, but you will activate and train the correct muscles.
2. If you are feeling sharp pains in your wrist or elbows, stop the exercise. This exercise can have a high impact on your joints in your arms, especially if your form is not correct. You do not want to cause any damage.
3. You can place your feet together, shoulder width apart, or wide. The closer your legs are together, the harder your core will work to stabilize your body.
4. If you do not have dumbbells, you can use other surfaces like a small boxes, steppers, or anything else you can think of as long as the surfaces are the same height.
5. I try to do 5 sets of 5-10 reps with a 60 second break in between each set. If this is the last exercise I do of the day, I do as many reps as possible until I reach failure.


Have you ever tried Explosive Pushups with Dumbbells? Are there any other variations of pushups that you like to do? Contact me with corestrengthalec@gmail.com with questions, comments, or ideas for other topics.

Hollow Body Holds

This is one of the greatest core conditioning exercises out there. It may look simple, but after only a few seconds, you will feel your core burning! Hollow Body Holds will strengthen your entire core and will help condition your body for many other exercises.

Hollow Body Holds 3

How to Perform Hollow Body Holds:
1. Lie down with your back on the floor and hands by your side
2. While keeping your lower back flat on the ground, activate your core to lift your legs, arms and shoulders a few inches off the ground.
3. Hold this position for 30-60 seconds (or as long a possible). The image shows the position to hold during a Hollow Body Hold.


TIPS:
1. You must keep your lower back flat on the floor. Keeping your lower back connected with the floor will activate the appropriate muscles for this exercise.
2. You may find yourself shaking during this exercise. As long as you are not uncomfortable, try to push through it. You may shake because your muscles are not used to the tension from this exercise, but it means that your muscles are working hard. Be prepared to be sore tomorrow!
3. BREATHE! Do not hold your breath during this exercise. Focus and take slow deep breaths.
4. Keep your legs tight together!

Have you ever tried Hollow Body Holds? How long can you hold a Hollow Body Hold? Contact me at corestrengthalec@gmail.com with questions, comments, and ideas for new topics.

What is HIIT?

HIIT 1
Many of you may have heard about HIIT training before, but don’t really understand what it is. I’m going to briefly explain the concept of HIIT training and how you can include it into your workout.

WHAT IS HIIT?
HIIT stands for High Intensity Interval Training. The concept of HIIT is alternating low-intensity intervals with high-intensity intervals. The most common and simplest form of HIIT can be applied to running, however HIIT can be used in many different exercises such as burpees, box jumps, squats etc.

WHAT IS AN EXAMPLE OF A HIIT WORKOUT?
When running, instead of running at a steady pace for 15 minutes, try doing a low-intensity interval alternated with a high-intensity interval. For example, 30 seconds of walking, then 30 seconds of seconds of sprinting. Doing 15 rounds of this exercise would be a great HIIT workout. Push yourself hard during the sprint. Many times we are comfortable at one speed, however it is not even close to our max speed needed to do a sprint. The more you push yourself (under safe conditions), the better the results.

WHY IS IT EFFECTIVE?
Because of the high interval training, you are able to really work on your endurance, increase your metabolism, burn fat, and help build muscle.

Cassandra Fiorella @petitefi

@petitefi

    Endurance: According to a 2011 study presented at the American College of Sports Medicine Meeting, 2 weeks of HIIT improves your aerobic capacity as much as 6-8 weeks of endurance training.
    Burn Fat: Because of the high intensity, your body works hard to repair itself. After a HIIT workout, you burn more calories over a 24 hour span than you would during a regular endurance program because your body is constantly working in repair mode to recover your muscles.
    Metabolism: HIIT increases the production of your HGH (Human Growth Hormone) by up to 450% which helps burn more calories throughout the day and is suppose to help slow down the aging process.

HIIT is never easy because you have to push yourself hard, but the outcome may surprise you. Since adding HIIT into my workouts, I have noticed a huge change in my body and my abilities as an athlete.

Do you include HIIT workouts into your workout routine? What are some of your favorite intervals to do? Let me know at corestrengthalec@gmail.com.

Raised L-Sits

Are you ready for another great stabilization exercise? L-sits are one of my favorite core strengthening exercises to perform because you can engage your entire core with one simple move. L-sits are a great exercise to add to any workout plan, and no matter what your fitness level, there is always room for growth and improvement with this exercise.

Raised L Sit

How to do Raised L Sits:
1. Grab two bars or stable surfaces of equal height and set them about 1 to 2 feet apart from each other. (The distance apart depends on the comfort of each person individually)
2. Place one hand on each surface and squat down to prepare for the exercise.
3. With your arms straight, raise your legs up off the floor in front of you.
4. Straighten your legs so they are now parallel to the floor.
5. Hold this position for as long as you can and then lower your legs back to the floor.
6. Repeat this exercise for the allotted amount of sets.

TIPS:
1. Track your progress with L-sits. The first time you try this exercise, you may only be able to hold this position for a few seconds, but after only a few weeks, you will see a huge difference in what you can do. Seeing your time increase will help motivate you to keep pushing your limits.
2. Keep your chest open and up. Keep your back straight and do not hunch when doing this exercise. Hunching will activate the wrong muscles and may even cause muscle strain.
3. Breathe. Like most stabilization exercises, it is common for people to hold their breath. I am sometimes guilty of this too, but holding your breath will cause unnecessary tension throughout your entire body which will actually make this exercise harder.
4. Look straight ahead! Try not to look down at the floor or at your legs, and don’t lift your head up. Pick something straight in front of you to focus on.
5. Your toes can be flexed or pointed during this exercise, but choose one. You want to really activate your legs and keep them straight and tight in this workout. If you let your feet just dangle, you will not be fully engaging your legs in this exercise.
6. If you do not have bars for this exercise, you can use two platforms, chairs, or even stacks of books.
7. My goal for this exercise is usually to hold the L-sit from 30-60 seconds and I do about 5 sets. If I do them right in a row, I try to take about a one minute break in between each set.

Have you ever tried Raised L-sits? Let me know what you think of this exercise and let me know if you have any other questions or comments by emailing me at corestrengthalec@gmail.com.

Handstand Negatives

Handstand Negatives 1

This is the next step in learning how to do Handstand Pushups. If you have not tried any of the previous workouts suggested in order to learn how to do a handstand pushup, CLICK HERE. Handstand Negatives depend on a slow controlled motion to strengthen and train your back, shoulder, and core muscles.

To Perform Handstand Negatives:
1. Place a pad, pillow, or soft surface on the floor and against the wall.
2. Face the wall and prepare to kick up into a handstand. To do so, place your hands a few inches away from the wall, on either side of the pad, and kick your legs up. You should end in an upside-down position with your back facing the wall.
3. Bend at your elbows and slowly lower your head down to the pad.
4. Lower your legs back to the ground by pushing off the wall with your feet.
5. Stand back up and repeat steps 2-5 for the allotted amount of reps.

Handstand Negatives 2

TIPS:
1. The exercise is ALL ABOUT CONTROL. Holding the handstand position will practice stability, but also the lowering down will activate those muscles needed to do a handstand pushup.
2. When lowering your head down to the pad, try to lower as slow as possible. Taking 3-5 seconds is ideal. The slow motion will make this exercise hard, but effective. It will really test and work a wide arrange of muscles in your upper body.
3. Once your head is down on the pad, try pushing up from this position. It is ok if you can’t, just kick up into a handstand before every negative. If you can do a pushup, do another handstand negative after the pushup.
4. Try doing 5 negatives at a time at first and then try and work your way up to 10 consecutive reps. At first you may not be able to lower yourself slowly, but over time really test yourself and try to lower yourself as slow as possible.

Have you ever tried Handstand Negatives? Have you been following my guide to learning handstand pushups? Let me know what you think. Contact me at corestrengthalec@gmail.com with any questions, comments, or ideas for new topics.