Back And Core Workout – April 2015

This is a workout I did the other day. I was pleased with how well it worked and how efficient it was. It did not take too much time, but I definitely felt a great pump and was sore all over the next day. Try it out and let me know what you think.

Photo by Kevin Thomas Garcia KTGnyc.com

Model: Alec Varcas
Photo by Kevin Thomas Garcia
KTGnyc.com

Warmup:
30 minutes of moderate intensity cardio.

Working Sets:

  • 1. Superset 1: 4 rounds
    • 3 Drop sets of seated rows. 10 reps each. (10 reps at heavy, medium, then light weight)
    • 10 raised shoulder push-ups
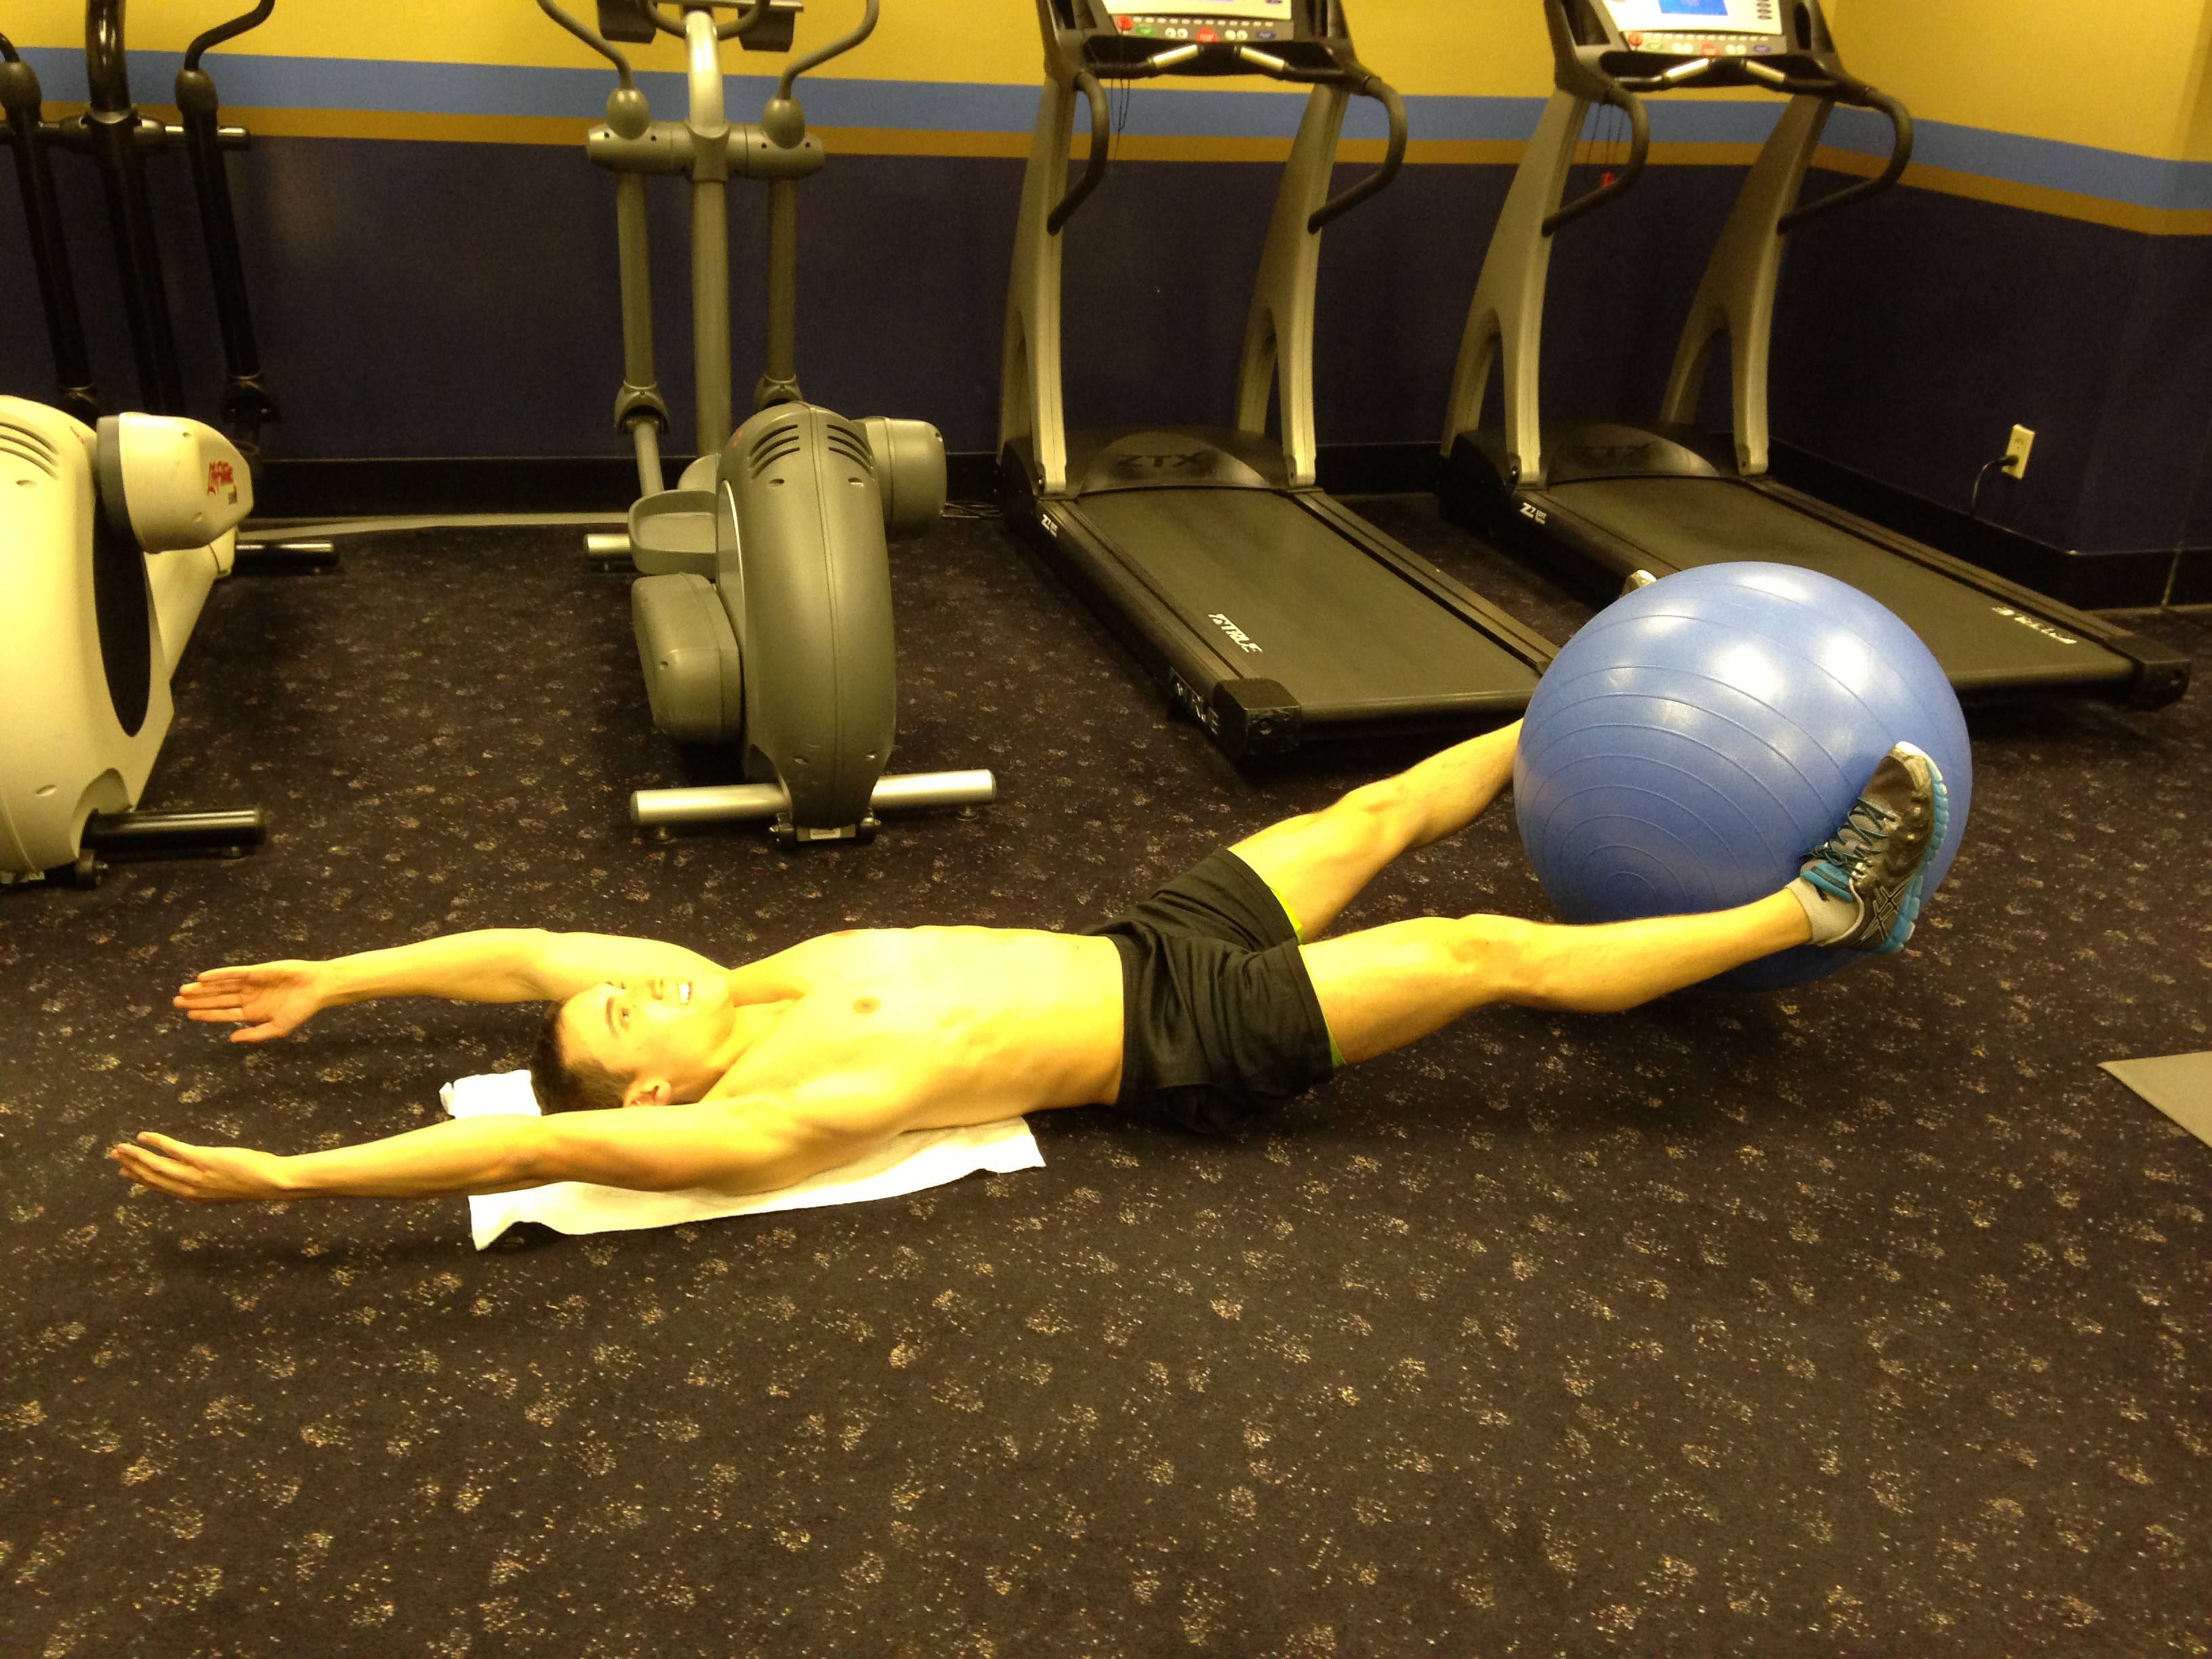
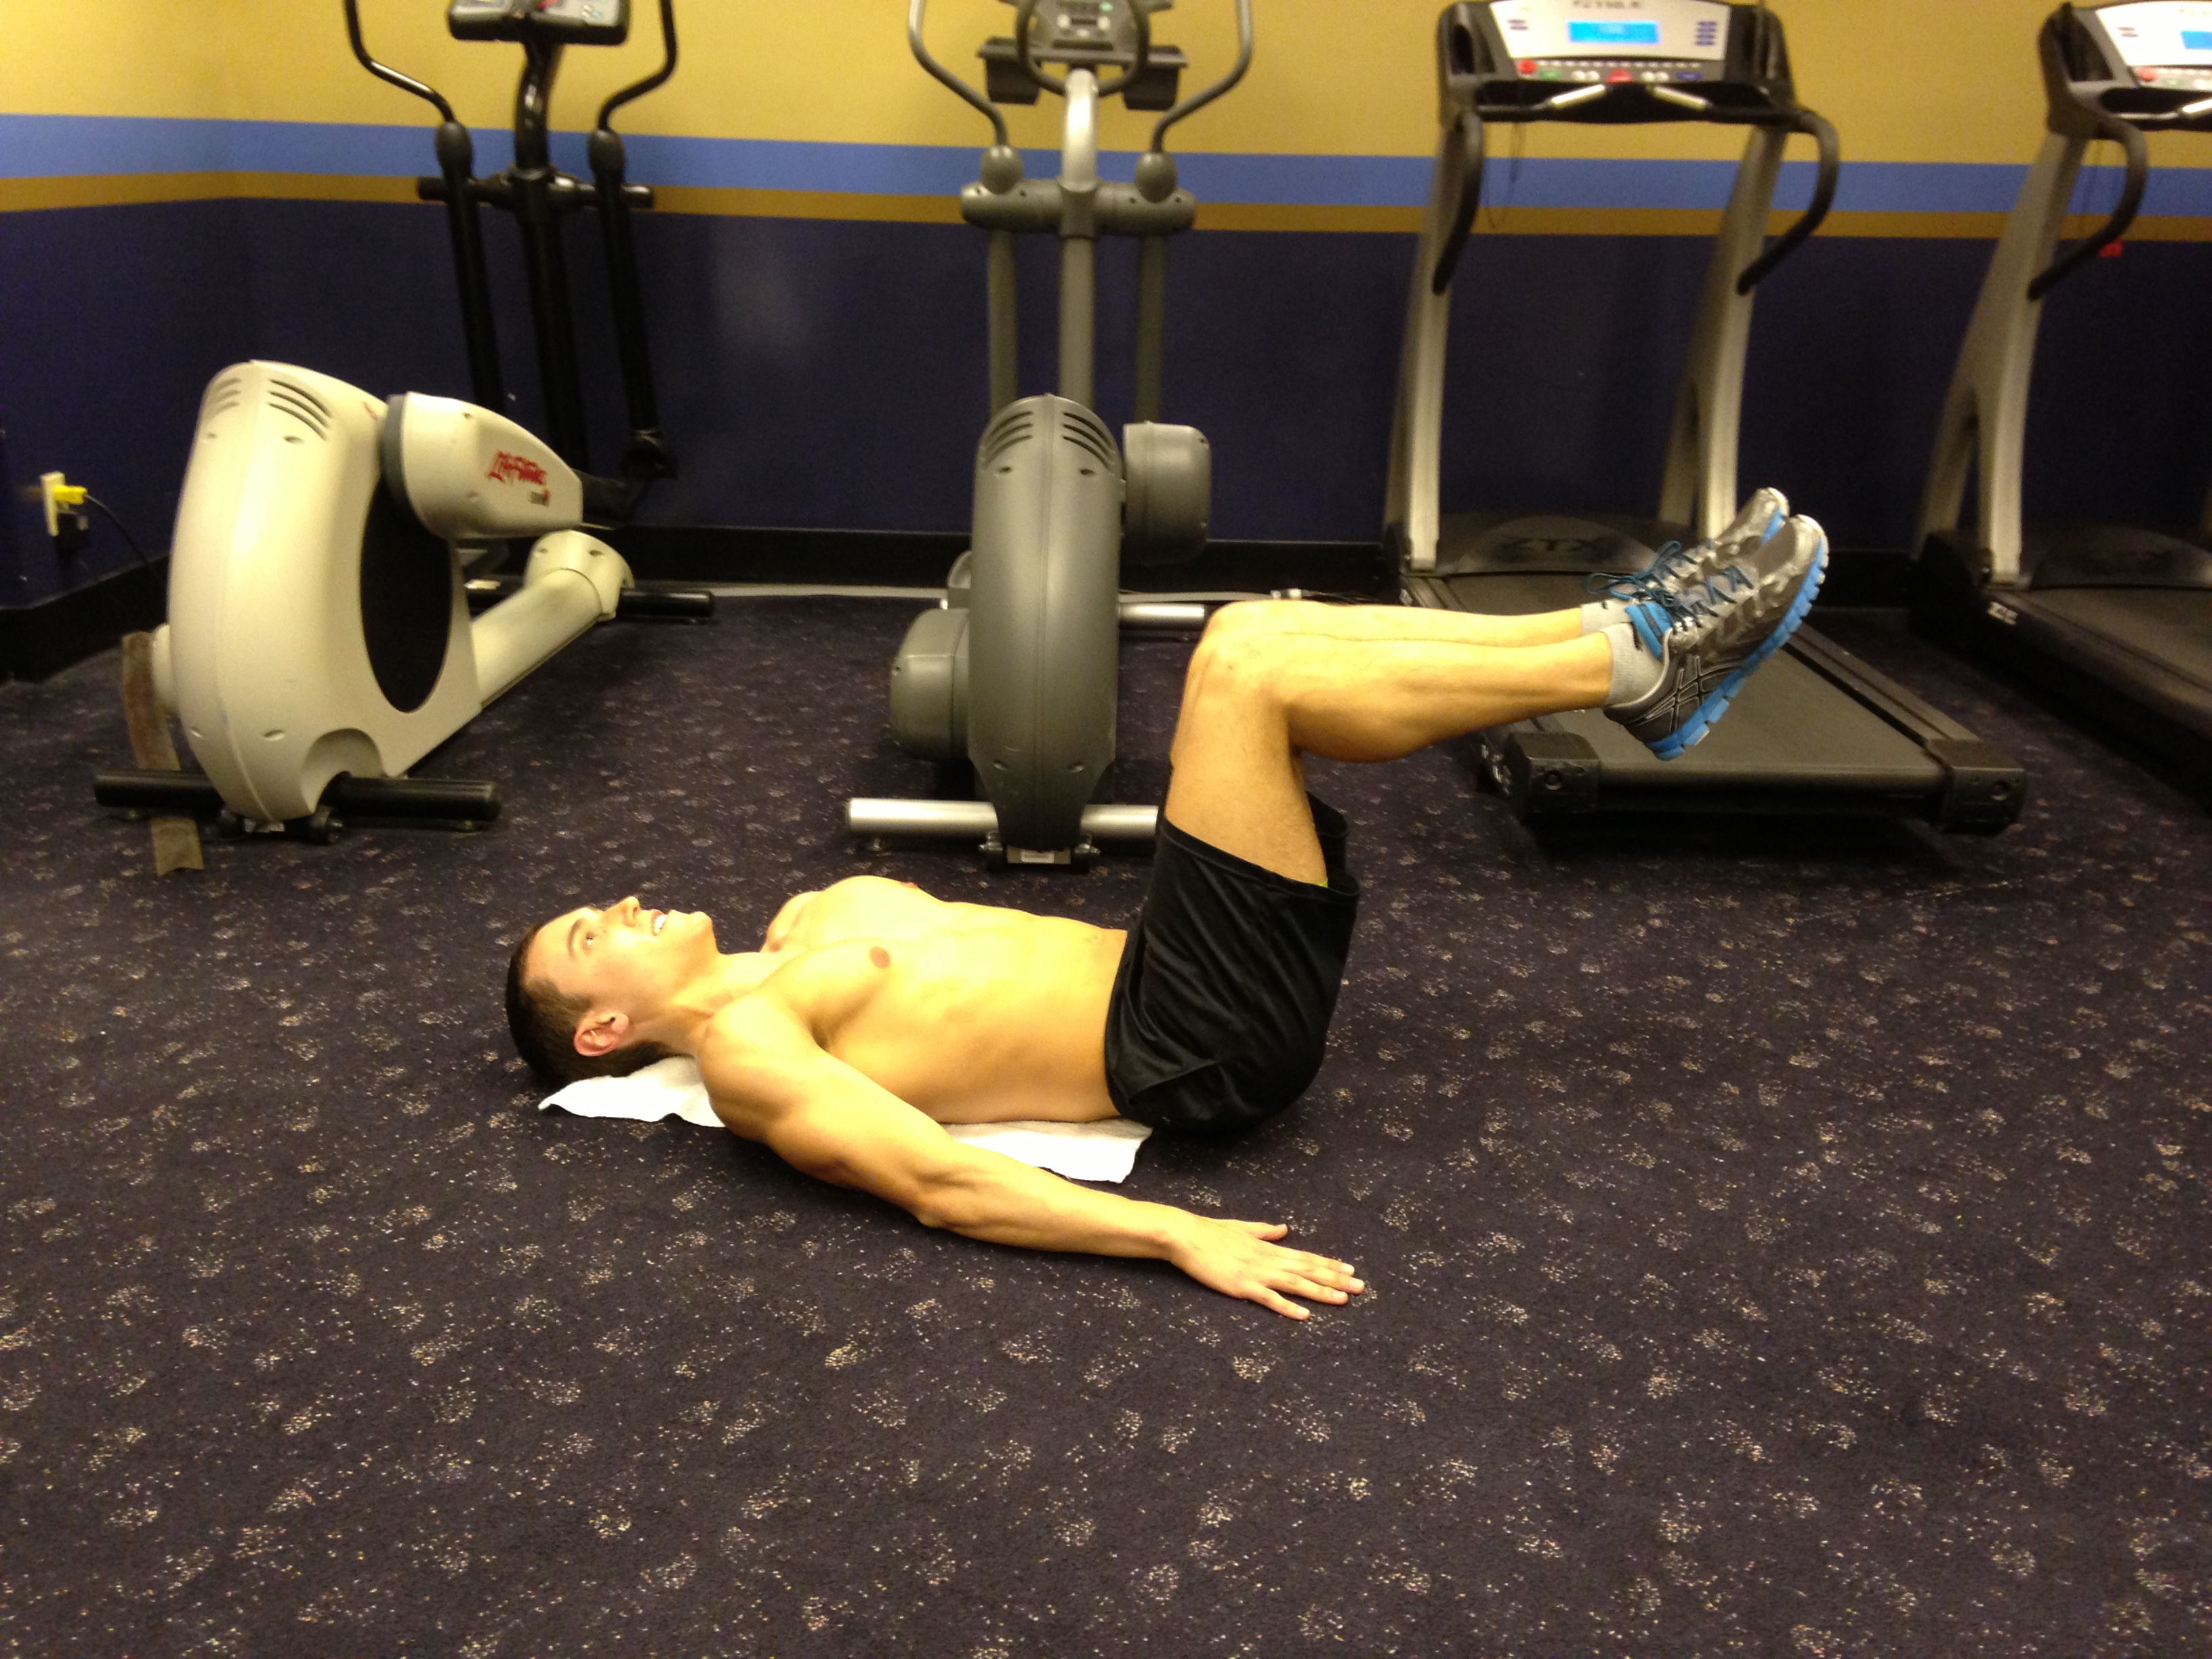
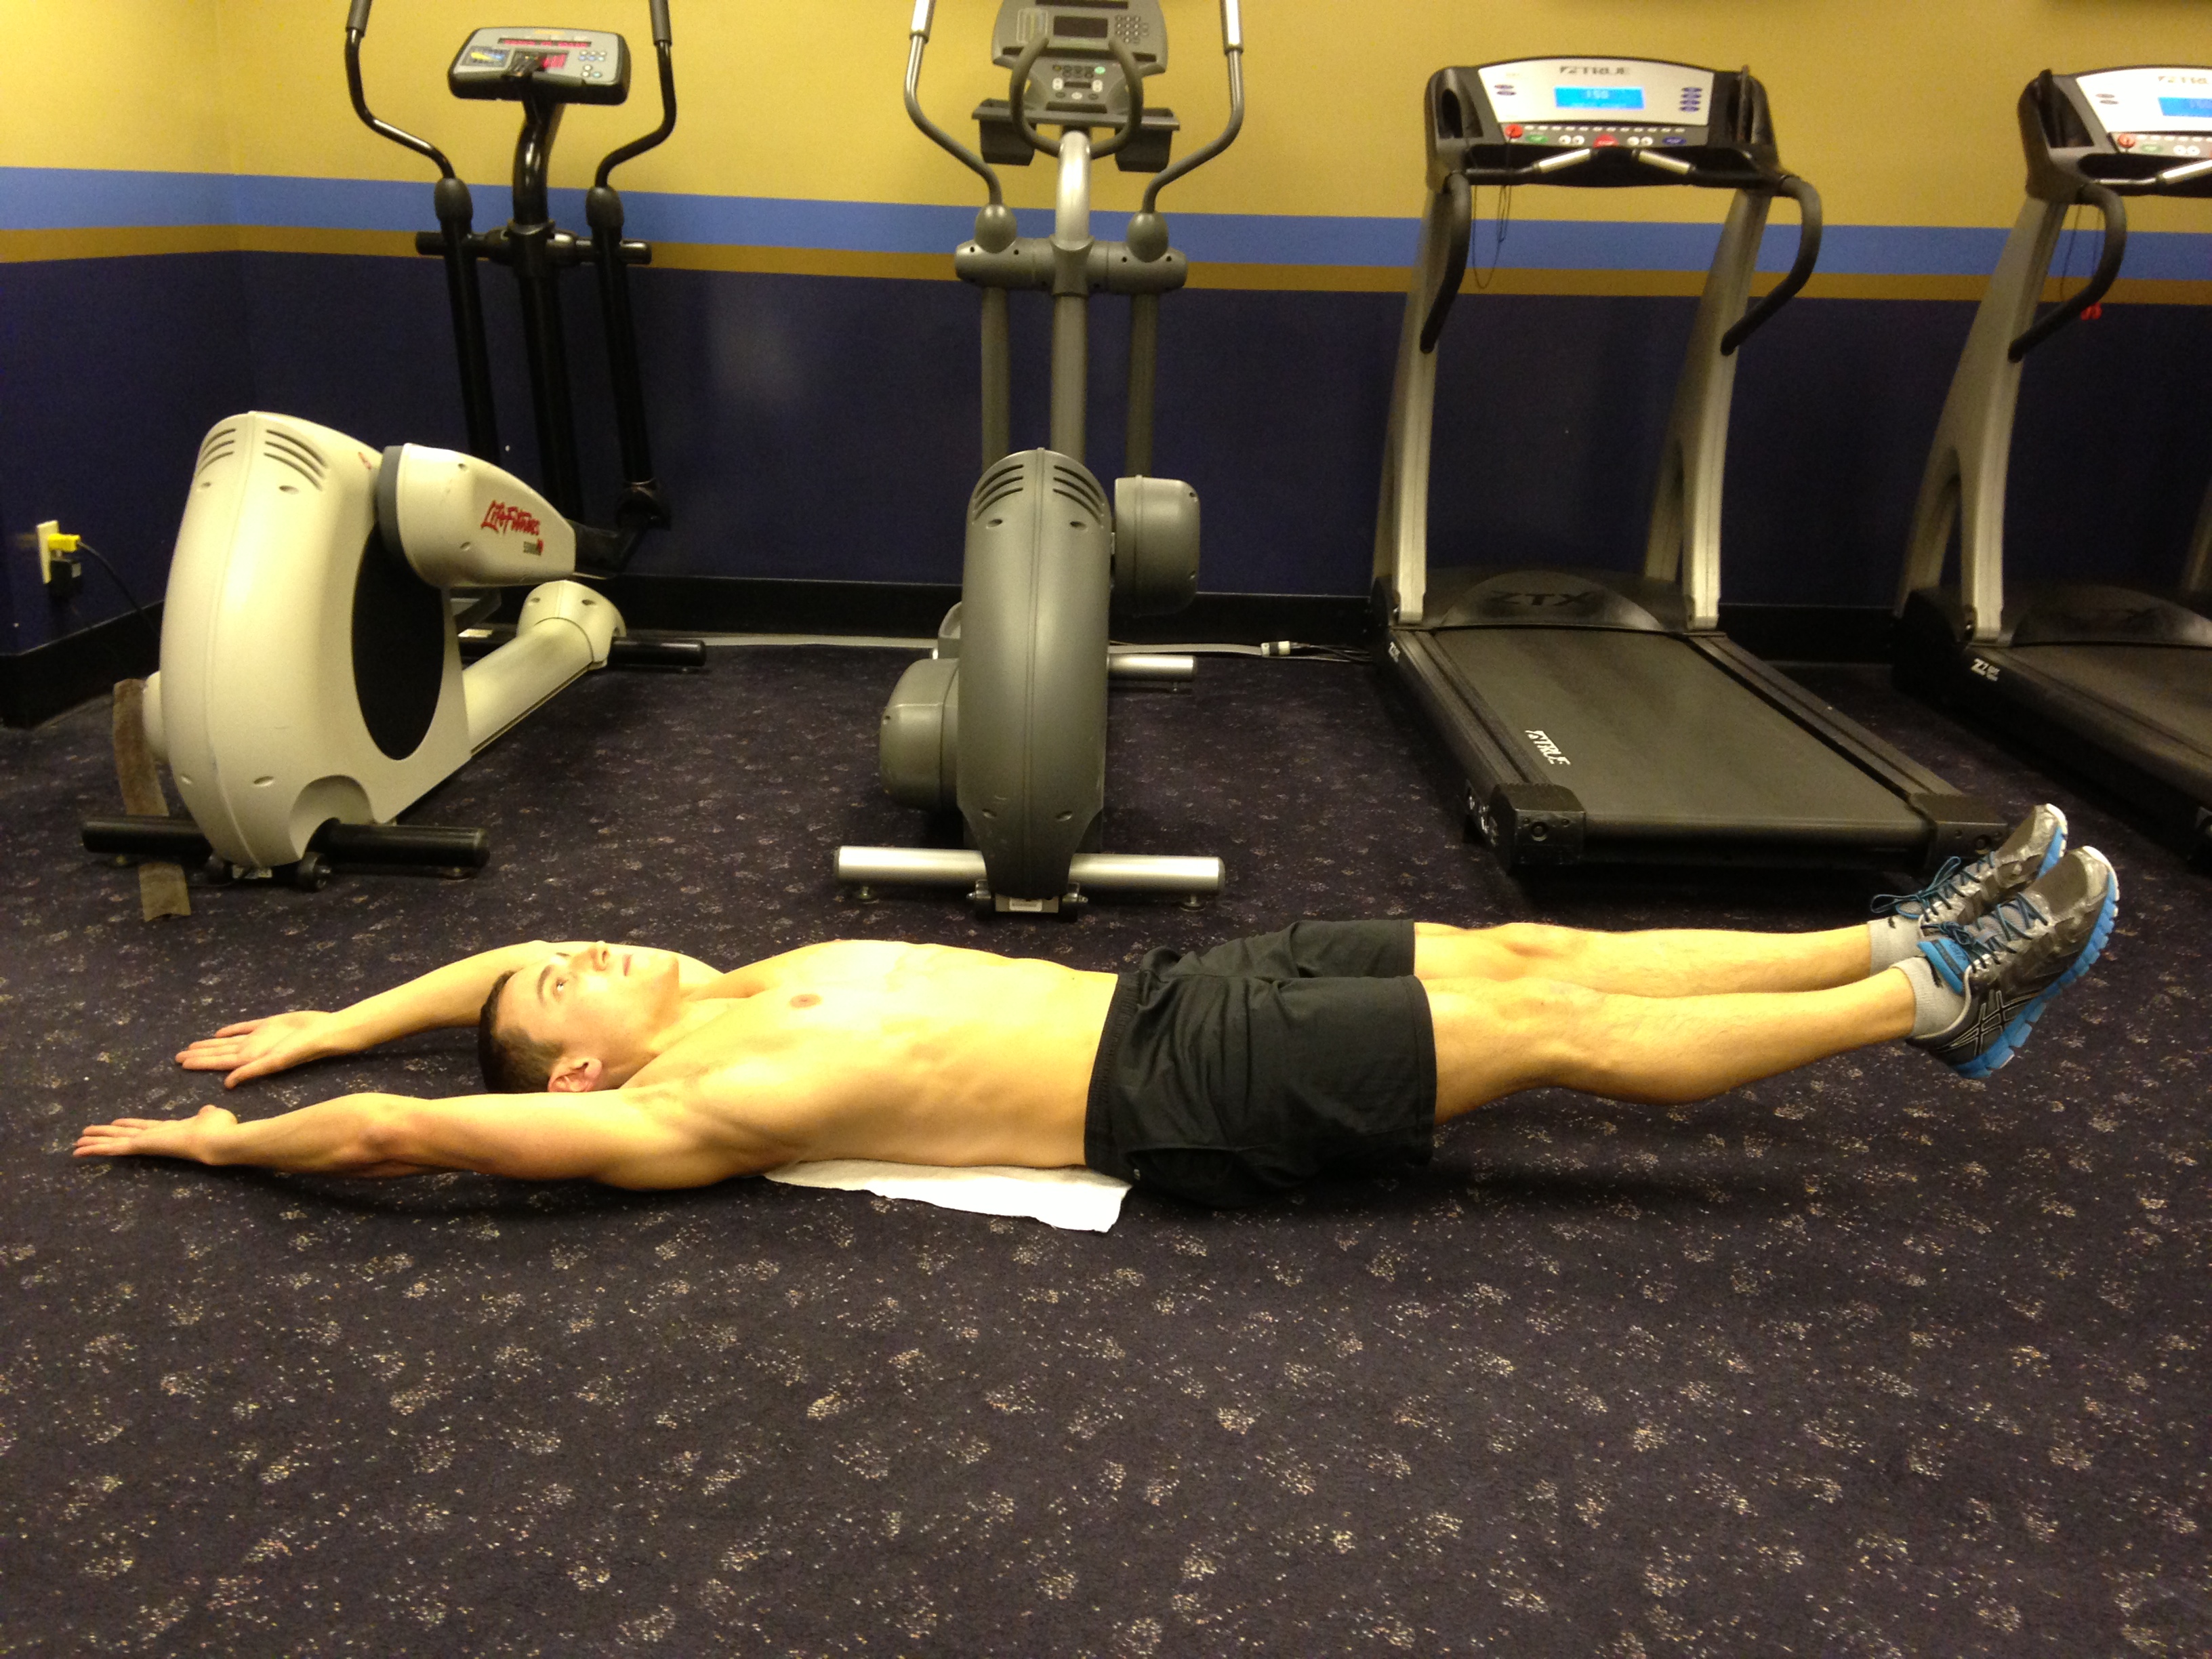
    • 45 second hollow hold
    • 1 minute rest
  • 2. 50 reps of Lsit pull-ups
    (10 sets of 5 with a 30 second rest)
    • 3. Superset 2: 3 rounds
      • 15 reps of rear delt flyes
      • 1 minute side plank on each side
    • 4. 5 sets of farmer carries
      • 5. 10 handstands until failure
        • 6. Stretch
          • TIPS:
            1. For my moderate intensity cardio, I decided to walk at 4.0 speed on a 7.5% incline on the treadmill for 30 minutes. This burned a little over 300 calories.
            2. When I say “3 Drop sets of seated rows. 10 reps each,” start with a heavier weight and do 10 reps of seated rows. Immediately after, lower the weight and do another 10 reps, and then lower it one more time and do another 10 reps. You will do 30 reps total during this drop set, and eventually end up doing 120 total after you do the 4 rounds of that super set. I ended with doing 120lbs, then 80 lbs, then 40 lbs.
            3. During the “50 reps of Lsit pull-ups,” you can break them up however you want. I did 10 sets of 5 reps with a 30 second rest in between each set. Also, during this exercise, you can use a wide grip, or a close grip.
            4. When I did the “10 handstands until failure,” I did mine off the wall and just tried to hold my position. If you are not comfortable with handstands, try holding the handstand against the wall for as long as you can.

            Hope you enjoy this workout as much as I did. Let me know what you think or if you ended up modifying any of the exercises. If you have any questions, comments, or ideas for new topics, contact me at corestrengthalec@gmail.com

            Raised L-Sits

            Are you ready for another great stabilization exercise? L-sits are one of my favorite core strengthening exercises to perform because you can engage your entire core with one simple move. L-sits are a great exercise to add to any workout plan, and no matter what your fitness level, there is always room for growth and improvement with this exercise.

            Raised L Sit

            How to do Raised L Sits:
            1. Grab two bars or stable surfaces of equal height and set them about 1 to 2 feet apart from each other. (The distance apart depends on the comfort of each person individually)
            2. Place one hand on each surface and squat down to prepare for the exercise.
            3. With your arms straight, raise your legs up off the floor in front of you.
            4. Straighten your legs so they are now parallel to the floor.
            5. Hold this position for as long as you can and then lower your legs back to the floor.
            6. Repeat this exercise for the allotted amount of sets.

            TIPS:
            1. Track your progress with L-sits. The first time you try this exercise, you may only be able to hold this position for a few seconds, but after only a few weeks, you will see a huge difference in what you can do. Seeing your time increase will help motivate you to keep pushing your limits.
            2. Keep your chest open and up. Keep your back straight and do not hunch when doing this exercise. Hunching will activate the wrong muscles and may even cause muscle strain.
            3. Breathe. Like most stabilization exercises, it is common for people to hold their breath. I am sometimes guilty of this too, but holding your breath will cause unnecessary tension throughout your entire body which will actually make this exercise harder.
            4. Look straight ahead! Try not to look down at the floor or at your legs, and don’t lift your head up. Pick something straight in front of you to focus on.
            5. Your toes can be flexed or pointed during this exercise, but choose one. You want to really activate your legs and keep them straight and tight in this workout. If you let your feet just dangle, you will not be fully engaging your legs in this exercise.
            6. If you do not have bars for this exercise, you can use two platforms, chairs, or even stacks of books.
            7. My goal for this exercise is usually to hold the L-sit from 30-60 seconds and I do about 5 sets. If I do them right in a row, I try to take about a one minute break in between each set.

            Have you ever tried Raised L-sits? Let me know what you think of this exercise and let me know if you have any other questions or comments by emailing me at corestrengthalec@gmail.com.

            Handstand Negatives

            Handstand Negatives 1

            This is the next step in learning how to do Handstand Pushups. If you have not tried any of the previous workouts suggested in order to learn how to do a handstand pushup, CLICK HERE. Handstand Negatives depend on a slow controlled motion to strengthen and train your back, shoulder, and core muscles.

            To Perform Handstand Negatives:
            1. Place a pad, pillow, or soft surface on the floor and against the wall.
            2. Face the wall and prepare to kick up into a handstand. To do so, place your hands a few inches away from the wall, on either side of the pad, and kick your legs up. You should end in an upside-down position with your back facing the wall.
            3. Bend at your elbows and slowly lower your head down to the pad.
            4. Lower your legs back to the ground by pushing off the wall with your feet.
            5. Stand back up and repeat steps 2-5 for the allotted amount of reps.

            Handstand Negatives 2

            TIPS:
            1. The exercise is ALL ABOUT CONTROL. Holding the handstand position will practice stability, but also the lowering down will activate those muscles needed to do a handstand pushup.
            2. When lowering your head down to the pad, try to lower as slow as possible. Taking 3-5 seconds is ideal. The slow motion will make this exercise hard, but effective. It will really test and work a wide arrange of muscles in your upper body.
            3. Once your head is down on the pad, try pushing up from this position. It is ok if you can’t, just kick up into a handstand before every negative. If you can do a pushup, do another handstand negative after the pushup.
            4. Try doing 5 negatives at a time at first and then try and work your way up to 10 consecutive reps. At first you may not be able to lower yourself slowly, but over time really test yourself and try to lower yourself as slow as possible.

            Have you ever tried Handstand Negatives? Have you been following my guide to learning handstand pushups? Let me know what you think. Contact me at corestrengthalec@gmail.com with any questions, comments, or ideas for new topics.

            Killer Core Workout

            Photography:  Peter Brown Apparel: Body Aware

            Photography: Peter Brown
            Apparel: Body Aware

            When it comes to core workouts, I like to dedicate one day during the week to just core exercises. This workout is the one that I have been using for the past few weeks to help build and tone my core. So far I have been feeling and seeing some great results. The thing I really like about this workout is that it does not only focus on one area of your abdominals, but instead focuses on your entire midsection from your abs, to your obliques, and even your lower back. This workout consists of groups of exercises that should be done right after another followed by a long rest. This will test your endurance and will help give you the results you are looking for. Try it out and let me know what you think.

            KILLER CORE WORKOUT!

            Cardio and Warmup:
            30 minutes of Cardio
            10 minutes of Stretching

            Group 1: (3 sets)
            Leg Lifts with Alternating Stability Ball x 15 reps (Click Here)
            Reverse Crunch with Stability Ball x 25 reps (Click Here)
            Leg Lifts With Stability Ball x 10 reps (Click Here)
            90 second rest
            * Do 3 sets of this Group of exercises

            Group 2: (3 sets)
            Kettlebell Side Bend x 20 reps on right
            Kettlebell Side Bend x 20 reps on left
            Ab roller x 15 reps
            90 second rest
            * Do 3 sets of this Group of exercises

            Group 3: (3 sets)
            Raised Side Plank on right x Hold for 1 minute (Click Here)
            Raised Side Plank on left x Hold for 1 minute (Click Here)
            Toes to Bar x 10 reps
            * Do 3 sets of this Group of exercises

            Group 4: (3 sets)
            Hollow Hold x Hold for 1 minute or until failure
            60 second rest
            * Do 3 sets of this exercise

            Group 5:
            Back hyperextensions x 200 reps. Rest when needed.
            * I usually do about 5-10 at a time and then rest for about 5-10 seconds.
            Stretch

            That is my Killer Core Workout that I have been doing once a week for the past month. It is definitely not easy, but it will help get you a strong and toned core. Let me know what you think of the workout and contact me with any questions, comments, or ideas for new topics at corestrengthalec@gmail.com

            Rolling Pistol Squats

            Rolling Pistol Squat: Step 1

            Rolling Pistol Squat: Step 2

            Rolling Pistol Squat: Step 3

            Rolling Pistol Squat: Step 4

            Rolling Pistol Squat: Step 5

            One of the benchmark exercises to do in any CrossFit gym is a Pistol Squat. Pistol Squats involve only using one leg to squat down and push back up to the standing position. This exercise is very difficult and requires a lot of practice and strength to complete. Rolling Pistol Squats are an easier variation of the standard Pistol Squat because they allow you to use momentum to your advantage. Rolling Pistol Squats are also a great cardio and full body workout.

            To Perform a Rolling Pistol Squat:
            1. Start in the standing position with both feet on the floor.
            2. Squat down with your glutes as close to the floor as possible and create a comfortable curve in your back to prepare to roll backward.
            3. Roll backward onto your back and raise your legs in the air.
            4. Using the momentum of throwing your legs forward, place one foot on the ground as close to your glutes as possible with the other leg straight out in front of you and stand up.
            5. Once standing, put the leg that is straight out in front of you back down to return to the standing position.
            6. Repeat the exercise from Step 2 and alternate legs with each rep.

            TIPS:
            1. When I roll backward, I like to keep my legs straight and bring my legs as close to my chest as I can. I give them a light pull with my hands and this allows me to give my hamstrings a stretch.
            2. The closer you can place your foot to you glutes when you role forward, the easier it will be to stand up.
            3. Momentum is key! Quickly bring your legs forward to make the push up from the floor easier.
            4. For anyone with a knee or hip injury, any variation of a pistol squat is not recommended. Never do a workout that causes you pain. Listen to your body!
            5. Rolling Pistol Squats are great to help tone your legs, but they also wok your core and provide a good cardio workout as well. I like to use Rolling Pistol Squats in between other exercises to keep my heart rate up. I usually do about 16 reps per set (8 on each leg), and about 3-5 sets during my workout.

            Have you ever tried Rolling Pistol Squats? Do you plan on adding these to your workout routine? I really appreciate any feedback. Contact me at corestrengthalec@gmail.com.

            Leg Lifts with Alternating Stability Ball

            I obviously like to use the stability ball in many of my core exercises and this exercise is no different. I like to do this exercise almost every time I do a core workout! I can feel it really working and strengthening my entire core from my upper abs, to my lower abs, obliques, and even lower back! Similar to the regular leg lift exercise with the stability ball I posted a few days ago, this exercise adds more difficulty to the standard leg lift exercise and really helps tone the “V” cut in your lower ab/hip region.

            Leg Lift (w. alt. stability ball) - Position 1

            Leg Lift (w. alt. stability ball) – Position 1


            Leg Lift (w. alt. stability ball) - Position 2

            Leg Lift (w. alt. stability ball) – Position 2


            Leg Lift (w. alt. stability ball) - Position 3

            Leg Lift (w. alt. stability ball) – Position 3


            Leg Lift (w. alt. stability ball) - Position 4

            Leg Lift (w. alt. stability ball) – Position 4

            To Perform a Leg Lift with Alternating Stability Ball:

              1. Lie flat on the ground with a stability ball between your feet.
              2. Extend both arms straight back behind your head.
              3. With the stability ball between your feet, raise the stability ball a few inches off the ground (Now you are in Position 1 as shown in the first picture to the right).
              4. While still squeezing the stability ball between your feet, lift your legs up so the stability ball is above your lower torso and lift your arms to touch and grab the stability ball (You are now in Position 2 as shown in the second picture to the right).
              5. Grab the stability ball with your hands, and let go of the stability ball with your feet.
              6. Bring the stability ball back behind your head so that it is a few inches off the floor while lowering your legs back down, leaving your feet a few inches off the floor. (This is Position 3, shown in the third picture to the right).
              6. While still holding the stability ball in your hands, raise the ball back up over your toso and raise your legs straight up to wrap around the sides of the stability ball (You are now in Position 4 as shown in the fourth picture to the right).
              7. Switch your grip of the stability ball from your hands to your feet.
              8. While squeezing the stability ball between your feet, lower your legs back down having the stability ball only a few inches off the floor and lower your arms back behind your head. (You have now returned back to Position 1)
              9. Repeat the exercise for the recommended amount of reps (I usually do three sets of 15 reps).


            Tips:

              1. When lowering your legs, both with and without the stability ball, it is important to activate your core and keep your back flat on the ground. Try not to create any sort of arch in your back during this exercise
              2. Try to make this exercise one fluid motion; don’t do each position one at a time. Instead, flow through the motions and make them nice and controlled.
              3. Exhale while lowering your legs down toward the floor.
              4. If you have never tried this exercise before, first try doing the exercise without the stability ball. If you can comfortably perform the exercise, then add the stability ball into your workout.
              5. Start with 8-10 reps of this exercise and work on reaching more reps as your core becomes stronger.
              6. To increase the intensity of this workout, you can also wear ankle/wrist weights for increased resistance.
              Hope you enjoy this exercise as much as I do. Let me know if you end up using it in your core workout routine. Have any questions or concerns? Email me at corestrengthalec@gmail.com

            Leg Lifts with Stability Ball

            Leg Lift (w. stability ball) - Position 1

            Leg Lift w. stability ball – Position 1

            This is another variation of a leg lift that I personally love doing in tandem with the Reverse Crunch exercise with the Stability ball (Click Here to see the Reverse Crunch stability ball exercise). Using the stability ball adds some resistance to the traditional leg lift which will activate your core muscles and your hips flexors. This exercise specifically helps target your lower abs and help create that “V” cut in your lower ab/hip region.

            To Perform a Leg Lift with a Stability Ball:

              1. Lie flat on the ground with a stability ball between your feet.
              2. Place both hand at your sides (Make sure to keep your back flat on the ground).
              3. While squeezing the stability ball between your feet, raise the stability ball a few inches off the ground (Now you are in Position 1 as shown in the picture above).
              4. While still squeezing the stability ball between your feet, lift your legs up to create a 90 degree angle with the floor (You are now in Position 2 as shown in the picture below).
              5. Lower your legs back down to Position 1 with the stability ball a few inches off the ground.
              6. Raise and lower your legs between Position 1 and Position 2 for the recommended amount of reps (I do 3 sets of 15 reps).
            Leg Lift w. stability ball - Position 2

            Leg Lift w. stability ball – Position 2

            Tips:

              1. As I said earlier, this is an exercise I like to do an tandem with the Reverse Crunch stability ball exercise. I usually do 25 reps of the reverse crunch exercise straight into 15 reps of the leg lift exercise, both using the stability ball. This gives my core a nice burn!
              2. Keep your back flat on the floor during this entire exercise. It is common to want to lift your lower back off the floor, but in order to target your core muscles to their fullest potential, your traps all the way down to your tailbone should be on the floor.
              3. Exhale while lowering your legs from Position 2 to Position 1 to activate your abdominals.
              4. You must use controlled motions during this exercise! Focus on using your core muscles to lift the stability ball.
              5. Try holding your legs in Position 1 for a second before raising your legs to Position 2. This will increase core strength and cause you to activate your core muscles affectively.
              6. If you are just beginning this exercise, first try doing Level 1 leg lifts. If you can comfortably perform level 1 leg lifts, move on to try level 2 and level 3 leg lifts. If you can perform those exercises, then move on to this exercise with the stability ball. This exercise is definitely harder than the other variations of leg lifts so start with 8-10 reps of this exercise and work on reaching more reps as your core becomes stronger.

            Hope you enjoy this exercise as much as I do. Let me know if you end up using it in your core workout routine. Have any questions or concerns? Email me at corestrengthalec@gmail.com

            Reverse Crunch (with Stability Ball)

            A few days ago, I posted an exercise I frequently do called the Reverse Crunch. That exercise is great for core strength and toning, but when I am at a gym, and there is proper equipment around, I like to mix things up a bit. This following exercise is the same as a Reverse Crunch, but you use a stability ball to add some difficulty. The stability ball adds a small amount of resistance, and it also forces you to use better form. You must tightly squeeze your abdominals in order to lift the ball from the ground and it also does not allow your legs to sway too far from a proper position.

            Reverse Crunch (w. ball) -  Position 1

            Reverse Crunch (w. ball) – Position 1


            Reverse Crunch (w. ball) -  Position 2

            Reverse Crunch (w. ball) – Position 2

            To perform a Reverse Crunch with a Stability Ball:

              1. Find a stability ball that allows you to rest your legs on top while creating a 90 degree angle at your hips and your knees (your calves and feet will be resting on the ball, parallel to the floor).
              2. Lie flat on your back with your hands at your sides.
              3. Place the Stability ball under your calves, resting against the back of your hamstrings. Your knees should only be a few inches apart.
              4. Squeeze your abs and legs in order to lift the stability ball slightly off the floor (You are now in Position 1 as shown in the first picture to the right).
              5. While squeezing the stability ball, raise your knees to your chest.
              6. While in motion of bringing your knees to your chest, roll your pelvis back and raise your hips up off the floor, creating a curve in your spine (You are now in Position 2 as shown in the second picture to the right).
              5. Hold Position 2 for a second and squeeze your abdominals.
              6. Slowly lower your legs and pelvis back down to Position 1.
              7. Repeat the exercise for the recommended amount of reps (I usually do 3-5 sets of 15 reps).

            Tips:

              1. Just like any serious ab exercise, control is important! These motions do not depend on momentum, but rather slow controlled motions that engage your muscles.
              2. If this exercise is too difficult, I recommend starting with Reverse Crunches without the Stability Ball. I give step by step directions on how to perform this exercise here: Click Here
              3. Notice that when lowering my legs back down to Position 1, I try not to let the ball touch the floor; this will keep your core activated the entire exercise. If you need to take a break mid-exercise, lower the ball to the floor completely, and when ready, lift the ball off the floor again.
              4. Another possible variation of this exercise, that I find a bit easier to do, would be to have your knees further apart on the ball. The wider your knees are from each other, the easier this exercise appears to be.
              5. Make sure to exhale while bringing your legs up into your chest (from Position 1 to Position 2), and inhale when returning your legs back down to Position 1.
              6. Squeeze your abdominals when you hit the peak of Position 2. You should feel a burn in your entire core.
              7. If you are performing this exercise on a mat, DO NOT hold the edge of the mat. Leave your hands flat on the ground, and depend solely on your abdominals to perform this exercise.
              8. You will notice that it is common for the ball to slip from your legs during this exercise. Try your hardest to keep it in place. If it does move, simply use your hands to get it back into a proper position and continue the exercise.
              9. Stability balls come in all different sizes. Try to find one that allows you to make a 90 degree angle at your hips and knees, letting your calves and feet lie parallel to the ground while resting on top of the ball.

            Let me know what you think of this new variation of the Reverse Crunch. I hope you like it! If you have any questions or concerns, email me at corestrengthalec@gmail.com

            Reverse Crunch

            For this blog, I like steering away from conventional situps and crunches because those are exercises I have done for years and almost everybody has tried a basic situp or crunch. Although they definitely still help strengthen your core, I would like to give you some workouts that you may not have seen or tried before to help amp up your core workout routine.

            This following exercise is a Reverse Crunch. It targets your core very well and when done correctly you can really feel the squeeze in your abdominals.

            Reverse Crunch -  Position 1

            Reverse Crunch – Position 1


            Reverse Crunch -  Position 2

            Reverse Crunch – Position 2


            To perform a Reverse Crunch:

              1. Lie flat on your back with your hands at your sides.
              2. Raise your knees to create a 90 degree angle at your hips and at your knees, leaving your feet parallel to the ground (You are now in Position 1 as shown in the first picture to the left).
              3. Pull your knees in towards your chest.
              4. While in motion of bringing your knees to your chest, roll your pelvis back and raise your hips up off the floor, creating a curve in your spine (You are now in Position 2 as shown in the second picture to the left).
              5. Hold Position 2 for a second and squeeze your abdominals.
              6. Slowly lower your legs and pelvis back down to Position 1.
              7. Repeat the exercise for the recommended amount of reps (I usually do 3-5 sets of 25 reps).


            Tips:

              1. Controlled motions are needed for this exercise. Do not depend on momentum to get our legs up and down. Engaging your lower abdominals to raise your legs and activating your entire core to perform slow controlled motions is how you will see and feel results.
              2. BREATHE!!! Your breath during this exercise will help activate your muscles. Make sure to exhale while bringing your legs up into your chest, and inhale when returning your legs back down to Position 1.
              3. Make sure to squeeze your abdominals when you hit the peak of Position 2. You should feel a burn in your core.
              4. If you are performing this exercise on a mat, do not hold the edge of the mat. Leave your hands flat on the ground, that way you will have to depend strictly on your abdominals to perform this exercise.

            I hope you like this new exercise. Let me know what you think. If you have any questions or concerns, email me at corestrengthalec@gmail.com

            Leg Lifts (Level 2 & Level 3)

            The following exercises are the Level 2 and Level 3 versions of the Leg Lifts I posted the other day. Although very similar to the Level 1 version, the Level 2 and Level 3 Leg Lifts are harder to perform. The only difference between the exercises is where you place your hands, but you will realize that the placement of your hands can strongly affect the impact of the exercise.

            Leg Lift (Level 2) - Position 1

            Leg Lift (Level 2) – Position 1


            Leg Lift (Level 2) - Position 2

            Leg Lift (Level 2) – Position 2

            To Perform a Level 2 Leg Lift:

              1. Lie flat on the ground with your feet together.
              2. Place both hands flat on the ground at your sides (Make sure to keep your back flat on the ground).
              3. Raise your feet 4-6 inches off the ground (Now you are in Position 1 as shown in the first picture pn the left).
              4. With your feet together and legs as straight as possible, lift your legs up to create a 90 degree angle with the floor (You are now in Position 2 as shown in the second picture on the left).
              5. Lower your legs back down to Position 1 with your feet a few inches above the floor.
              6. Raise and lower your legs between Position 1 and Position 2 for the recommended amount of reps (I do 3 sets of 25 reps).


            Leg Lift (Level 3) - Position 1

            Leg Lift (Level 3) – Position 1


            Leg Lift (Level 3) - Position 2

            Leg Lift (Level 3) – Position 2

            To Perform a Level 3 Leg Lift:

              1. Lie flat on the ground with your feet together.
              2. Raise your arms above your head extending to the wall behind you.
              3. Raise your feet 4-6 inches off the ground (Now you are in Position 1 as shown in the first picture on the right).
              4. With your feet together and legs as straight as possible, lift your legs up to create a 90 degree angle with the floor (You are now in Position 2 as shown in the second picture on the right).
              5. Lower your legs back down to Position 1 with your feet a few inches above the floor.
              6. Raise and lower your legs between Position 1 and Position 2 for the recommended amount of reps (I do 3 sets of 25 reps with this variation as well).


            Tips:

              1. You must keep your back flat on the floor during both of these exercise. Form is the most important aspect of these exercises, and if you are not able to perform this exercise, please try doing Level 1 Leg Lifts first to help strengthen your core and prepare yourself for these more advanced variations.
              2. Exhale while lowering your legs from Position 2 to Position 1. This will help activate the correct muscles
              3. CONTROL CONTROL CONTROL!!!! All motions must be as controlled as possible. Fast sloppy motions will not make this exercise affective.
              4. To increase core strength, hold your legs in Position 1 with your feet a few inches off the floor for a second before raising your legs to Position 2.
              5. Specifically for Level 3 Leg Lifts, keeping your hands above your head will assist in stretching out your core giving your abdominals a nice extensive workout.

            Hope you find these two new variations helpful. Have any questions or concerns? Email me at corestrengthalec@gmail.com