Wall Walks

Wall Walk 1

Wall Walk 2

Wall Walk 3

Wall Walk 4

One of the most common questions I get asked is how to do a handstand. This exercise is one of the best ways to learn how. Wall Walks strengthen your core and your shoulder muscles, they help you practice your stability, and because many people are afraid of falling and/or being upside-down, wall walks allow you to become more comfortable with the movement of a handstand while still feeling supported. Wall Walks are also a very important step in learning handstand pushups.

To Perform Wall Walks:
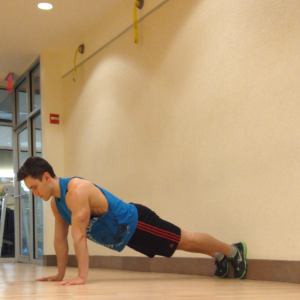
1. With your feet against the wall, start in a pushup plank position.
2. Slowly walk your legs up the wall by pushing your hands into the floor and feet into the wall.
3. Walk your hands back toward the wall as your feet get higher.
4. Crawl your feet up the wall as high as you feel comfortable. Hold this position for 3 seconds.
5. While walking your hands forward, slowly walk your feet back down the wall and return to the push-up plank position.
6. Repeat Steps 2-5 for the allotted amount of reps.

TIPS:
1. Only go to a height where you feel comfortable. You will still be strengthening your core and shoulders even if you don’t go all the way up the wall. Once you become comfortable, try getting higher until you can walk all the way up.
2. It is not a bad idea to have someone watch as your perform this exercise. It is good to have someone to catch you in case you want to try pushing yourself, but it is also important to have someone watch your form and make sure you are doing this exercise correctly.
3. Keep your core tight and back straight. It is very common to curve your back during this exercise which will compromise form and possibly cause muscle strain.
4. This exercise is to be done slowly. Having slow control of this exercise is key to activating the correct muscles.
5. I like to do about 3 sets of 5 reps.

Have you ever tried Wall Walks? Do you want to learn to do a handstand? Contact me at corestrengthalec@gmail.com with any questions, comments, or ideas for other topics.
Raised Shoulder Pushups

Raised Shoulder Pushup: Step 1

Raised Shoulder Pushup: Step 2

Once you have mastered the regular Shoulder Pushup, it is now time to increase the difficulty. These Raised Shoulder Pushups are the second step in the progression toward achieving handstand pushups. This exercise will help activate and strengthen the muscles in your back, shoulders, arms and core that you need to perform the more difficult handstand pushup.

To Perform Raised Shoulder Pushups:
1. While facing the forward, start by putting your hand on the ground and legs up on a raised surface behind you(bench or table).
2. Straighten your legs and straighten your back to create and ‘L’ Shape with your body. You will need to activate your core to hold this position.
3. Bend at the elbows and lower so your head is just above the floor.
4. Push back up to straighten your arms and return to the ‘L’ position.
5. Repeat Steps 3 and 4 for the allotted amount of reps.

TIPS:
1. If you have not tried regular shoulder pushups prior to this exercise, please Click Here to see how to perform a shoulder pushup.
2. Keep your back and legs straight to activate your shoulders, core and lats correctly.
3. Really use your core to keep the ‘L” shape in your body. Do not let your hips droop.
4. The tall the surface the harder the exercise is, so try starting with something that is only a few inches off the ground first and then work your way up to a taller surface such as a table.
5. Keep your neck in line with your spine. Don’t lift your head to look at the floor. That will cause unnecessary tension.

Have you tried Raised Shoulder Pushups? Are you working on getting handstand pushups? Contact me at corestrengthalec@gmail.com with questions, comments, stories, or ideas for other topics.

Shoulder Pushups

Shoulder Pushup: Step 1

Shoulder Pushup: Step 2

This is the first step in the progression toward achieving Handstand Pushups. To achieve a Handstand Pushup, you must have great shoulder, back, and tricep strength, but also a good core strength to maintain your balance while on your hands. Shoulder Pushups are an excellent way to start strengthening these muscles.

To Perform Shoulder Pushups:
1. Start in a Normal Pushup Plank Position
2. Walk your hands back and lift your hips toward the ceiling to create an upside down ‘V’ position with your body. Keep your legs and back as straight as possible and stay up on your toes.
3. Bend at the elbows and lower so your head is just above the floor.
4. Push back up to return to the V position.
5. Repeat Steps 3 and 4 for the allotted amount of reps.

TIPS:
1. Keeping your back and legs straight will help engage the proper muscles during this exercise. Most of the work should be done by your shoulders, however you will also feel your lats activating if done correctly.
2. Focus on keeping your hips up toward the ceiling. Don’t let them droop!
3. Keep your neck in line with your spine. Don’t lift your head to look at the floor. That will cause unnecessary tension.
4. Try doing 3 sets of 10 reps at first and build your way up to 3 sets of 20 reps. Once you can do 3 sets of 20 reps, increase the difficulty by trying Elevated Shoulder Pushups (Put your legs on a bench or table).

Have you tried Shoulder Pushups? Are you working on getting handstand pushups? Contact me at corestrengthalec@gmail.com with questions, comments, stories, or ideas for other topics.

Welcome to Core Strength Blog

This is my personal transformation over two years.

This is my personal transformation over two years.

My name is Alec Varcas and I decided to make this blog to help advise people on different workouts, diets, and lend a helping hand to anyone who may need it. I started gaining interest in health in nutrition about two years ago when I decided that I was not happy with how I looked or how I felt. I was going through some big life changes and thought that changing my workout routine and diet would help… and it definitely did. I am letting you know now that I am not a Certified Personal Trainer or a licensed nutritionist. I simply am creating this blog to give my opinion on certain health and exercise issues people may have, give advice simply based off of my own experience and constant research I have done, and show which workouts I like the best and which supplements and foods I find the most fulfilling.

I currently am on the Spamalot National Tour that is traveling around the United States from January to April 2013. Before being on tour, I studied Marketing at Quinnipiac University in Connecticut where I graduated in January 2012. I then began working for a Yale University funded study called the ‘Veterans Aging Cohort Study.’ While living in one place and having a steady schedule, I was able to go the gym 5-6 times a week very easily for as long as I wanted, basically whenever I wanted. I also was able to go shopping for any food I needed and cook/prepare any food at my own convenience. Being on tour and moving from city to city, I have realized how hard it is to maintain a strict diet and exercise schedule while traveling. With this being said, I thought this blog could have a strong focus on how to stay fit while on the road or when your resources (a kitchen, gym, time) may be limited.

My focuses for this blog will specifically include:
1) Giving advice on how to make healthy choices at popular restaurants
2) Showing specific workouts that I find to be the most effective to target certain areas of the body
3) Featuring people I idolize because of the progress they have made with their own fitness goals and sharing some of their fitness tips
4) Answering any questions you may have that you think I can help with

Please email me with any questions or blog topic ideas you may have at corestrengthalec@gmail.com
I look forward to hearing from you!